Saturday 3 November 2018

3 MAJOR COMPONENTS OF QUALITY CONTROL OF READY MIX CONCRETE

QUALITY CONTROL OF READY MIX CONCRETE Quality control of ready-mixed concrete may be divided into three components, 1. Forward control, 2. Immediate control and 3. Retrospective control. FORWARD CONTROL: Forward control and consequent corrective action are essential aspects of quality control. Forward control includes the following. • Control of purchased material Quality • Control of […]

The post 3 MAJOR COMPONENTS OF QUALITY CONTROL OF READY MIX CONCRETE appeared first on CivilBlog.Org.


from CivilBlog.Org https://civilblog.org/2018/11/03/quality-control-of-ready-mix-concrete/
via Our favorite Civil Engineering Blog

Thursday 27 September 2018

We’re moving

We have exciting news to share with you. BIM and BEAM is joining forces with the Autodesk Revit Blog to create one robust blog for expert-authored posts on BIM solutions for AEC design.

Since BIM and BEAM started 7 years ago, we’ve built a large community of structural engineers, detailers and fabricators who wanted to hear the latest news on product updates and events, and learn tips and tricks for getting the most from their Autodesk software subscription. We’ve decided to make this great content accessible to every Revit user, not just those from the structural professions.

By consolidating this content with the architecture, MEP, and general industry content on the Revit Blog, you’ll benefit from the top-notch posts that our Revit product managers, technical experts, and industry partners create, and you’ll be able to see it all in one place and at one time. Gone are the days of having to subscribe to two blogs for Autodesk building content.

We’ve also made some changes to the Revit Blog to make it even easier for you to access information that’s most important to you.

We’re excited about this change, and hope you’ll follow us to the Revit Blog.

The post We’re moving appeared first on BIM and Beam.


from my Autodesk source Bim & Beam: BIM and Beam at http://blogs.autodesk.com/bim-and-beam/2018/09/27/were-moving/
via IFTTT

Thursday 30 August 2018

Robot Structural Analysis mid-year update is here!

Now that the season of summer vacations is almost over, and everyone is returning to school and work, we have great news to energize you for a productive Fall. As the Robot Structural Analysis team, we want to show you our commitment to improving your experience with Robot Structural Analysis software. We are working hard on developing a more robust foundation for future versions of this tool. This work is happening below the surface, and as structural engineers, you know how important a solid foundation is for success.

While you’re waiting for bigger changes, we thank you for your patience and express our gratitude by releasing a mid-year update to address the issues that are important to your work.

This update contains the following important and critical changes:

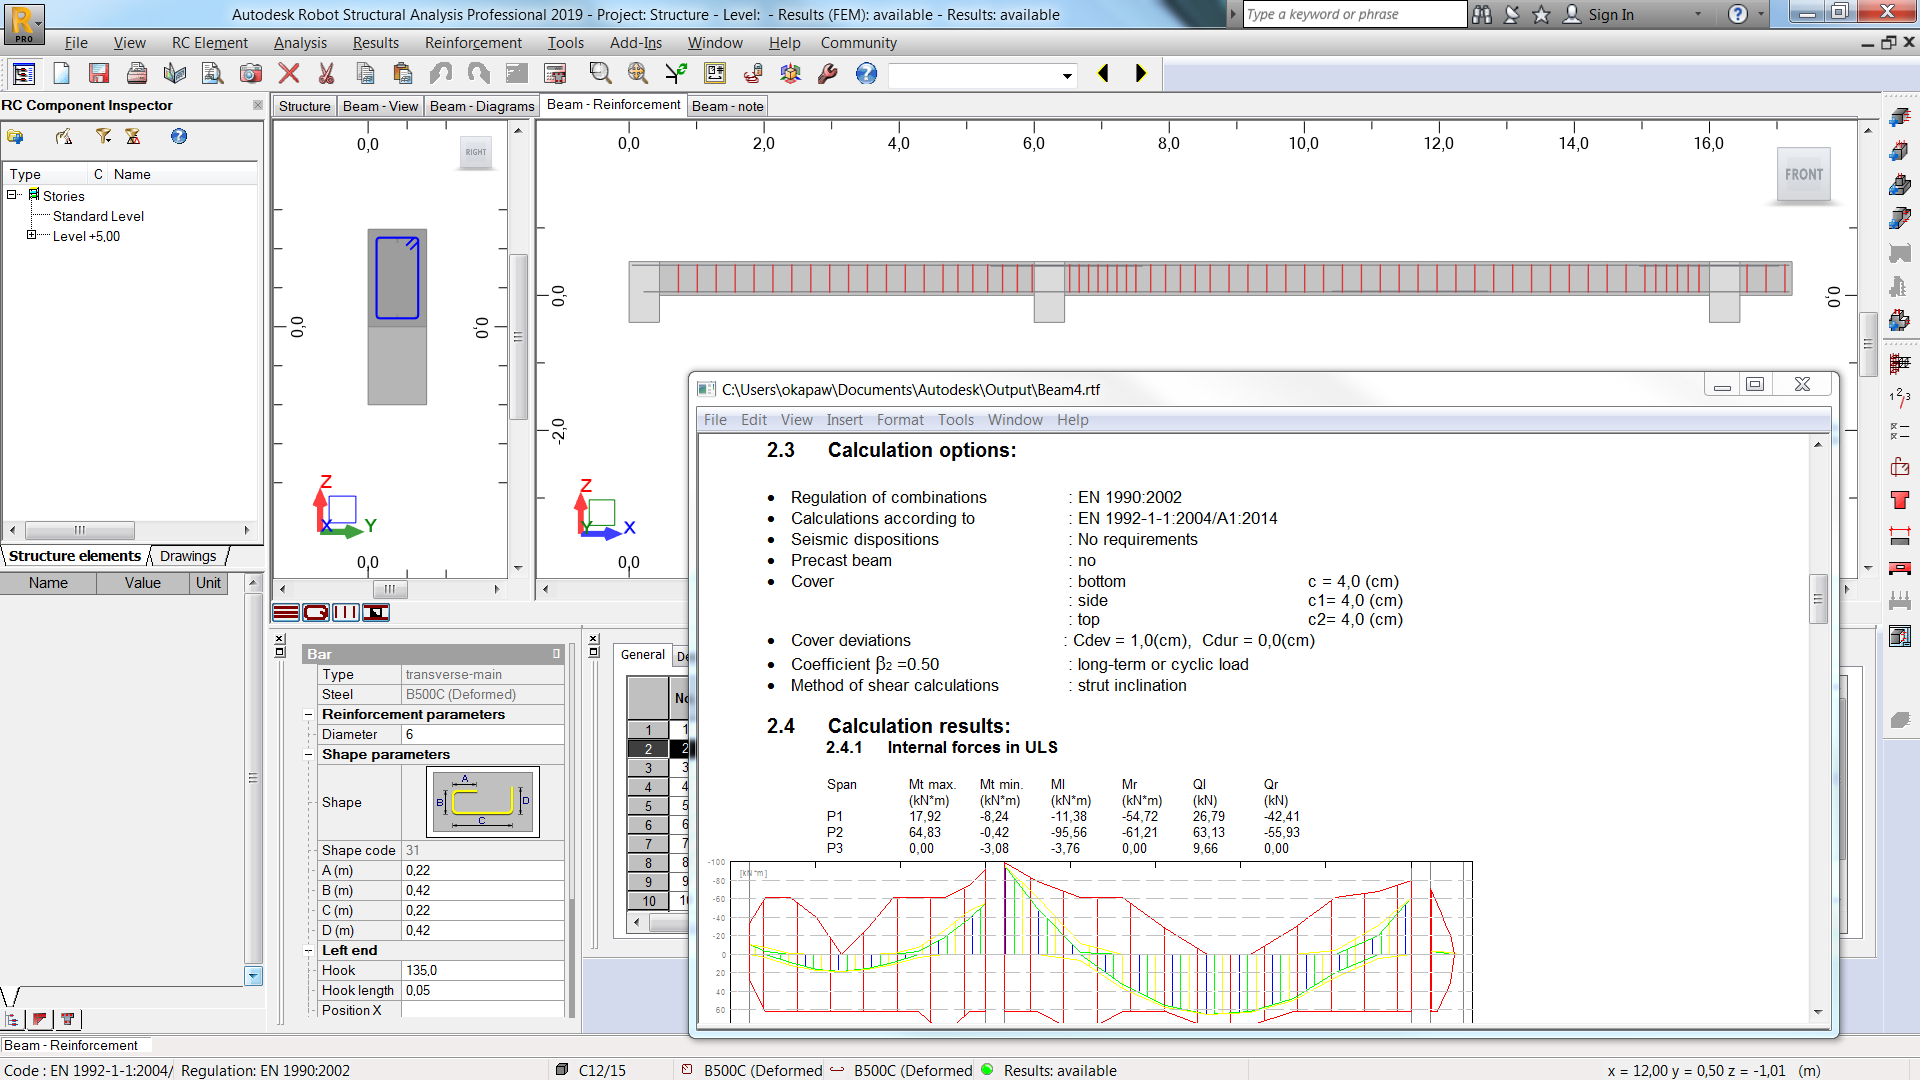
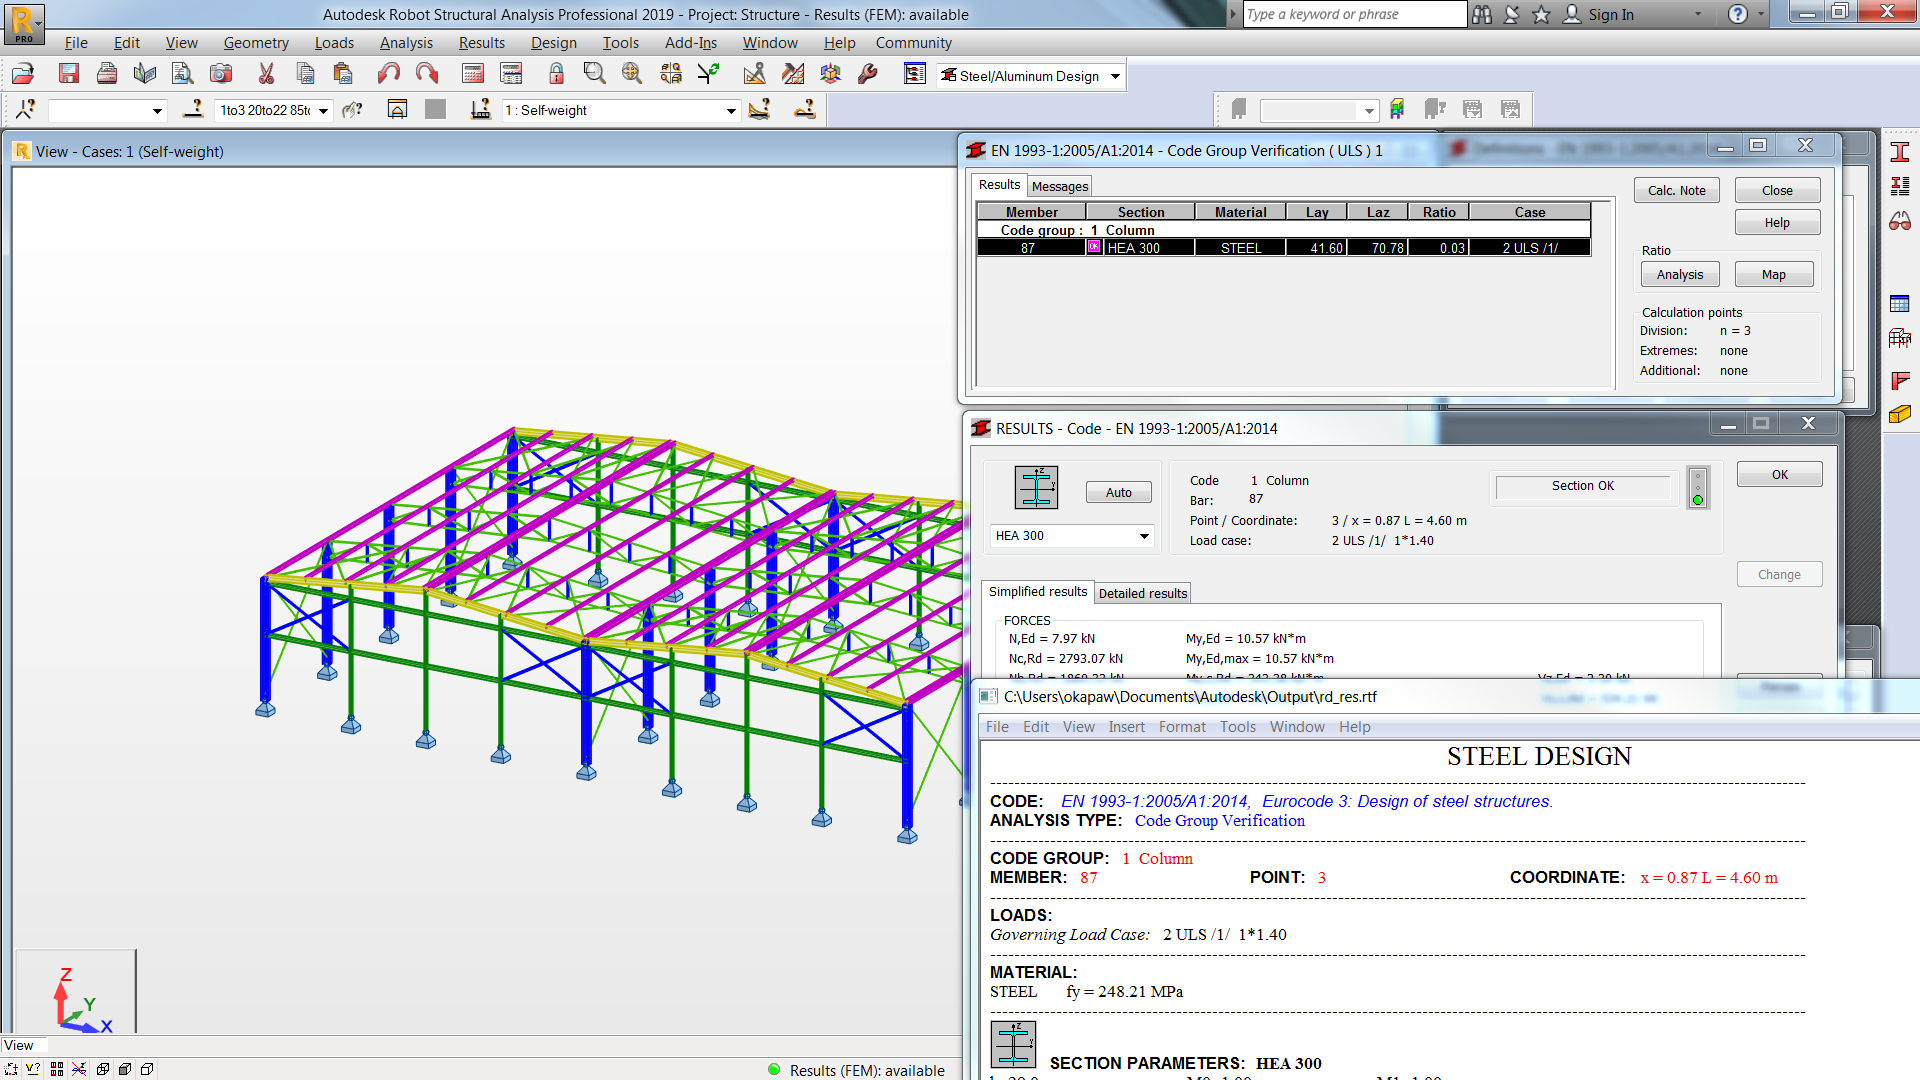
  • Eurocode design codes for Reinforced Concrete and Steel design have been updated to the current editions.

Reinforced Concrete Design

Steeel Design

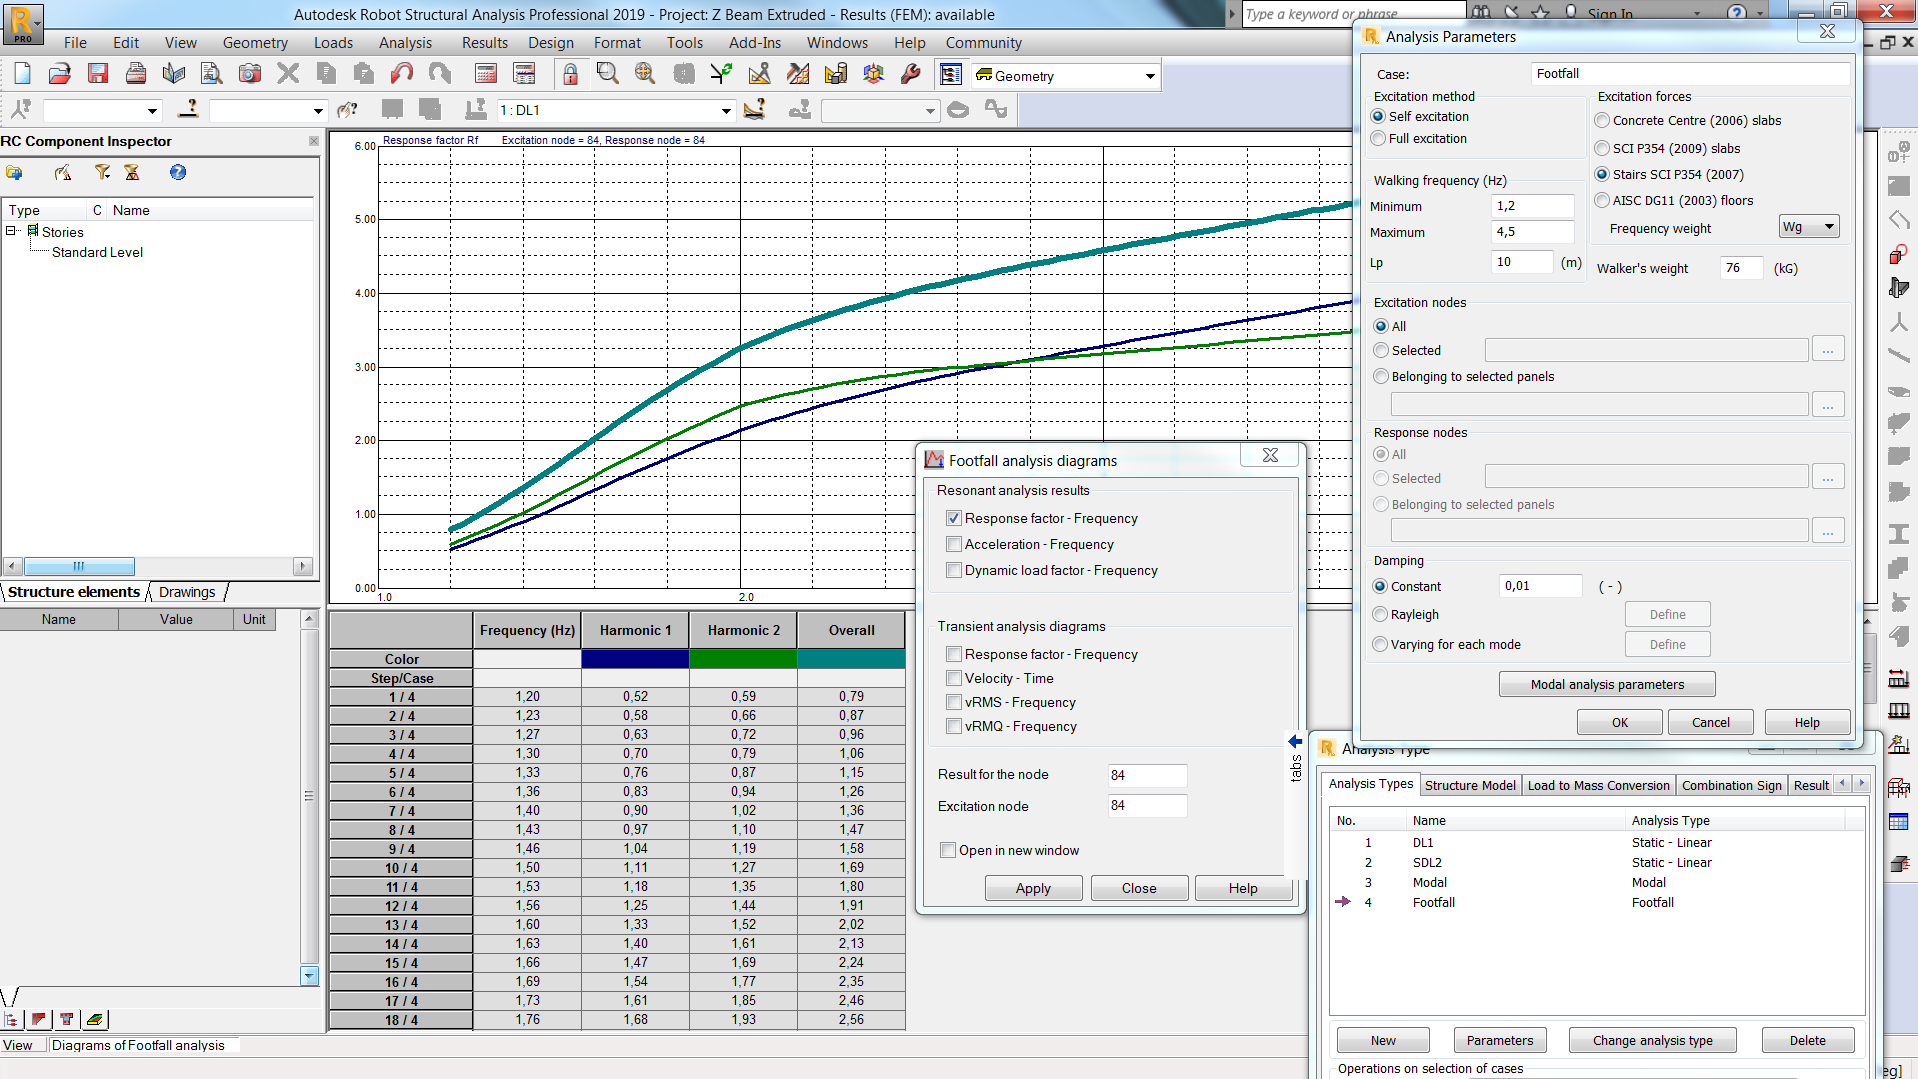
  • Footfall analysis according to SCI P354 is now updated to Revised Edition of February 2009

Footfall analysis

  • Major issues have been addressed in Reinforcement Concrete design of Beams and Columns according to ACI 318-11
  • Code-checking of steel connections according to Eurocodes 3 has been improved
  • Verification of concrete cone failure for groups of anchor bolts is fixed
  • Model display when using section planes has been improved
  • … and many more.

To get a full list of changes, please visit the Readme document.

You can download and install Robot Structural Analysis 2019 Update 1 through your Autodesk account. It is also available via Autodesk Desktop Application. Please make sure you have Robot Structural Analysis 2019 installed before you install the update.

We look forward to your feedback.

Enjoy,

Robot Structural Analysis Team

Related links:
Robot Structural Analysis in Autodesk AEC Collection
AEC Collection Workflows: Dynamo for Structure

The post Robot Structural Analysis mid-year update is here! appeared first on BIM and Beam.


from my Autodesk source Bim & Beam: BIM and Beam at http://blogs.autodesk.com/bim-and-beam/2018/08/30/robot-structural-analysis-mid-year-update/
via IFTTT

Wednesday 15 August 2018

Free Form Rebar Aligned Distribution in Revit 2019.1

Building on Autodesk’s strategy to make Revit a robust model authoring tool for designing and detailing, the Revit 2019.1 release includes an important update for concrete detailers and engineers that will help to increase modeling versatility, accuracy, and productivity. I am excited to share this new feature with you—take a look!

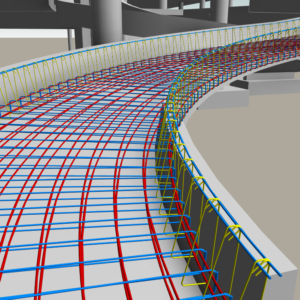
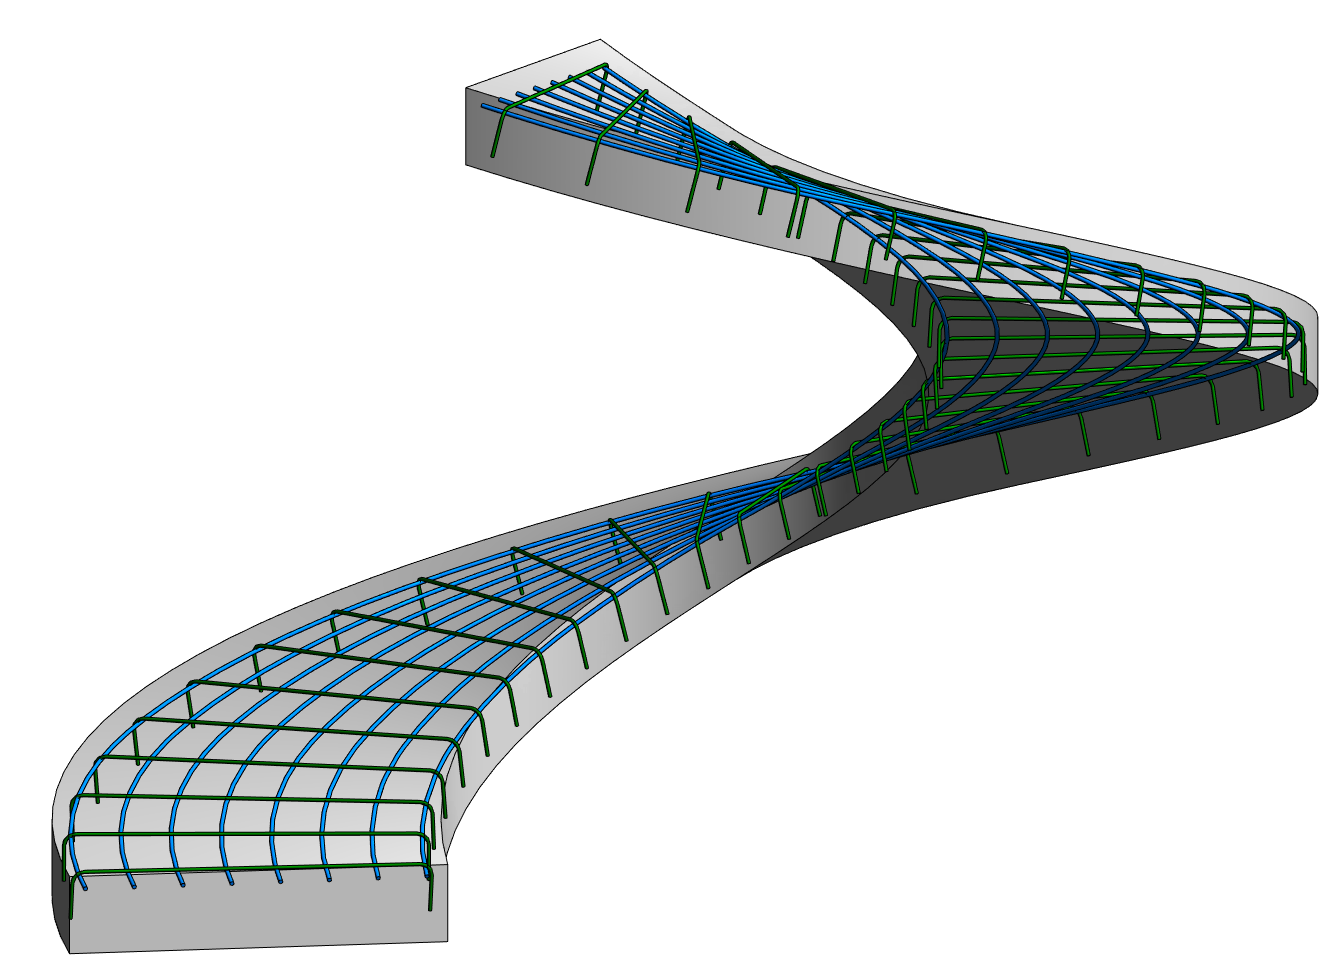
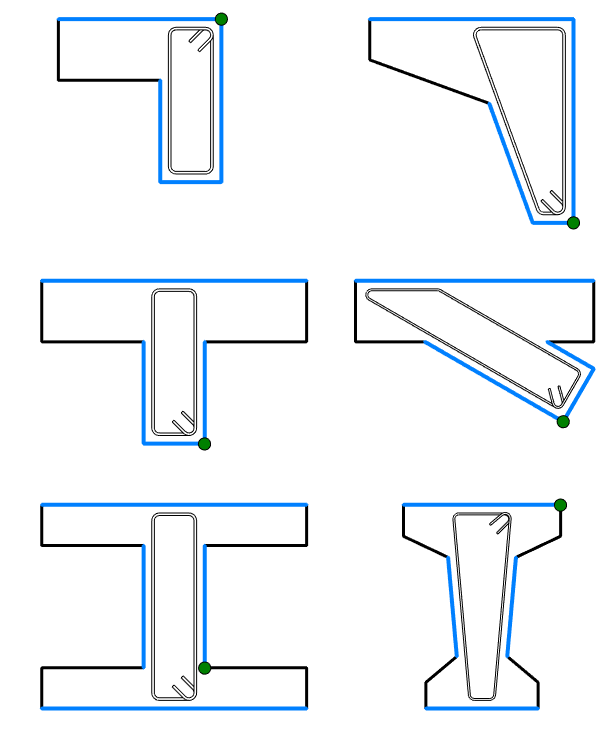
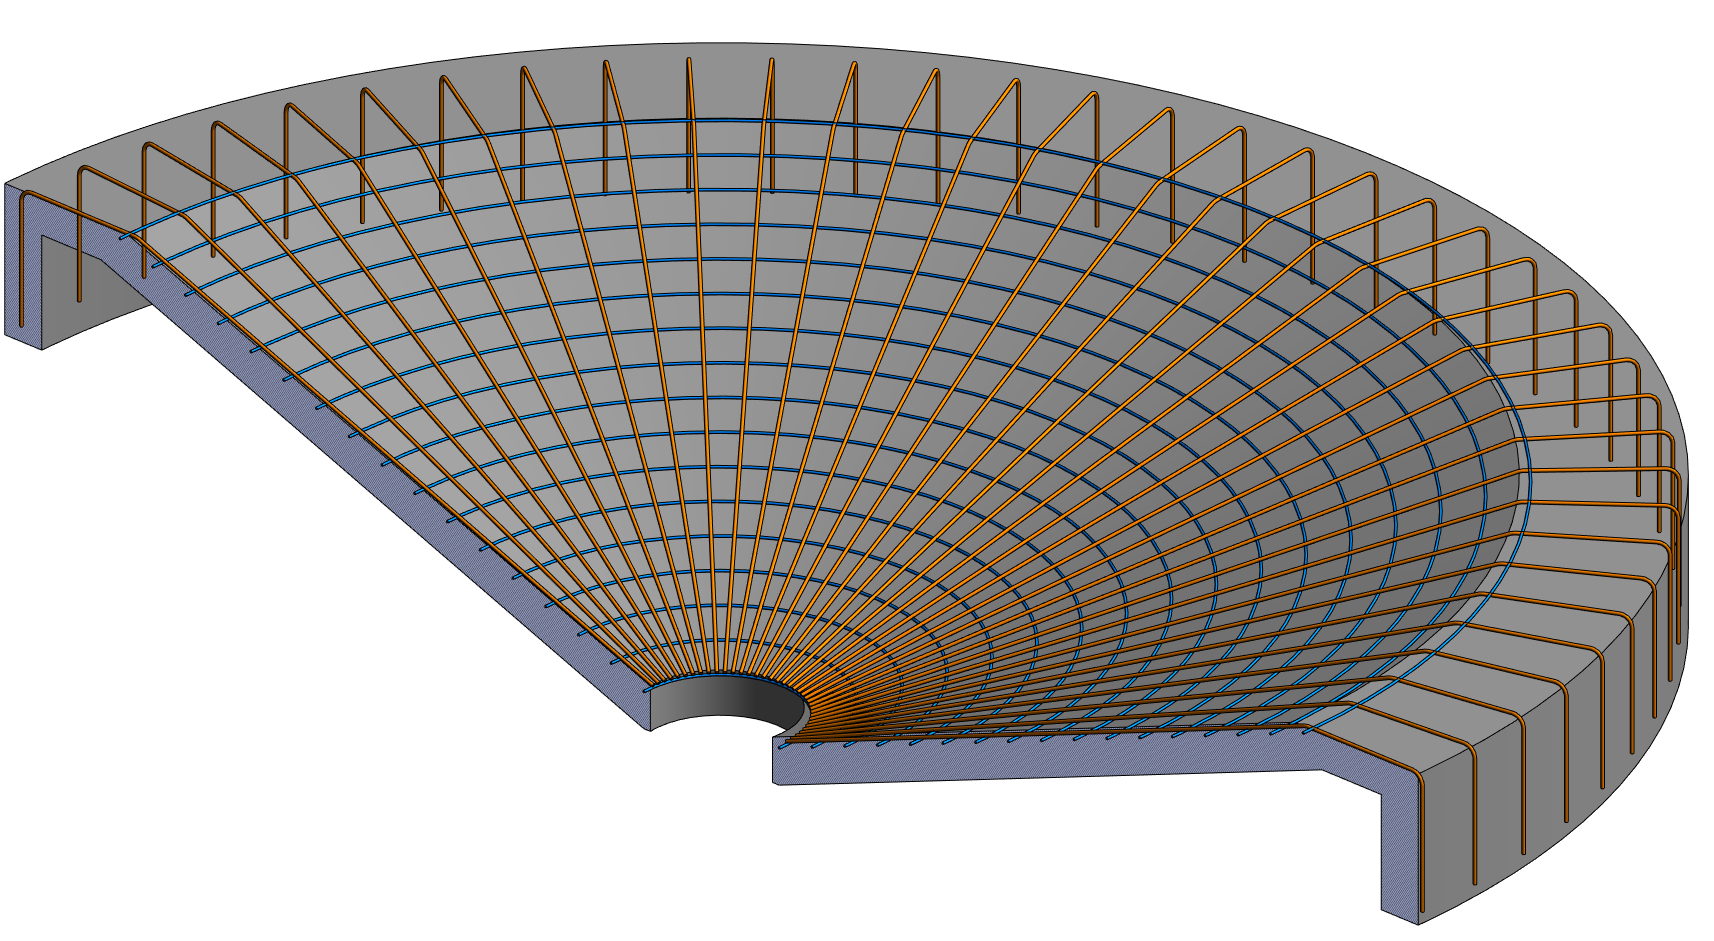
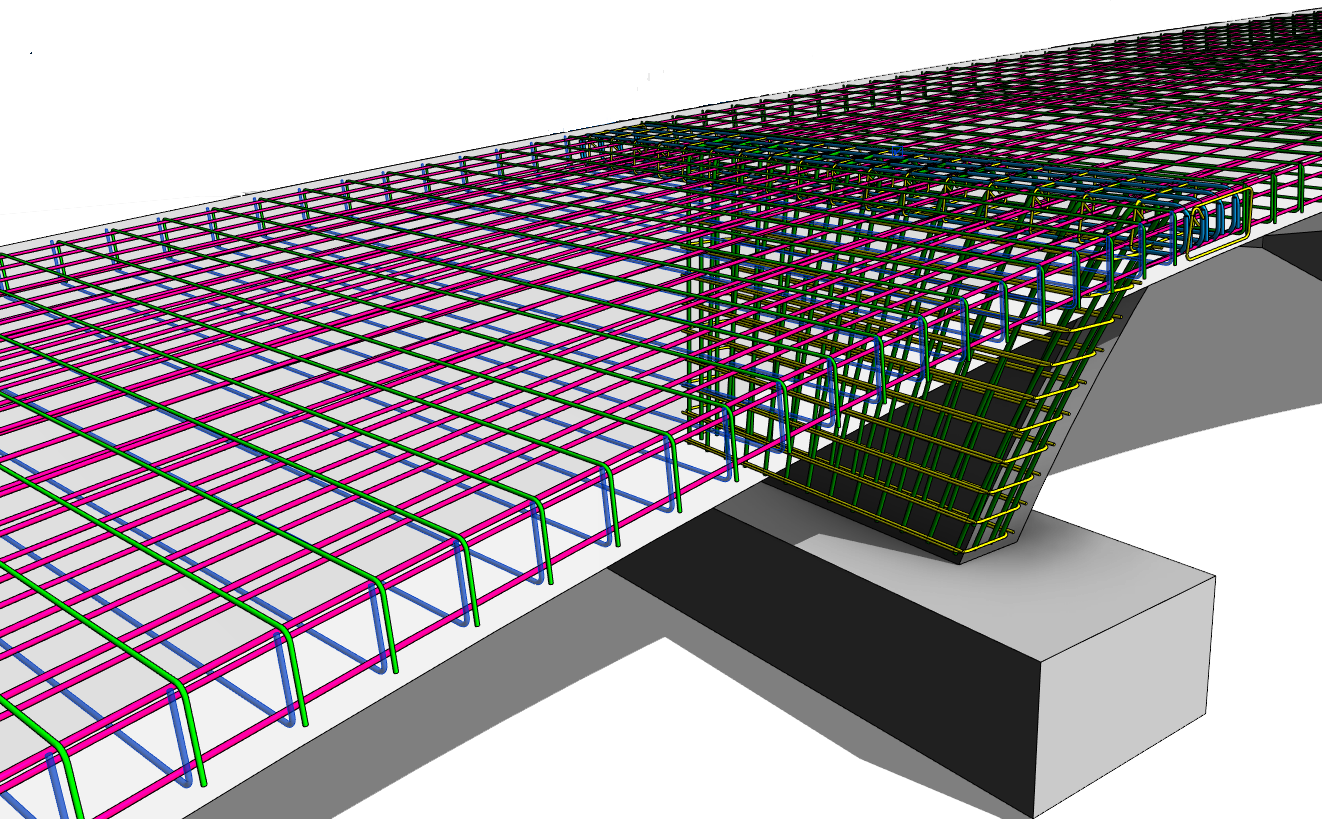
Free Form Rebars can now be used to create rebar sets with planar rebars distributed along the faces of a structural concrete element and aligned to a distribution path.

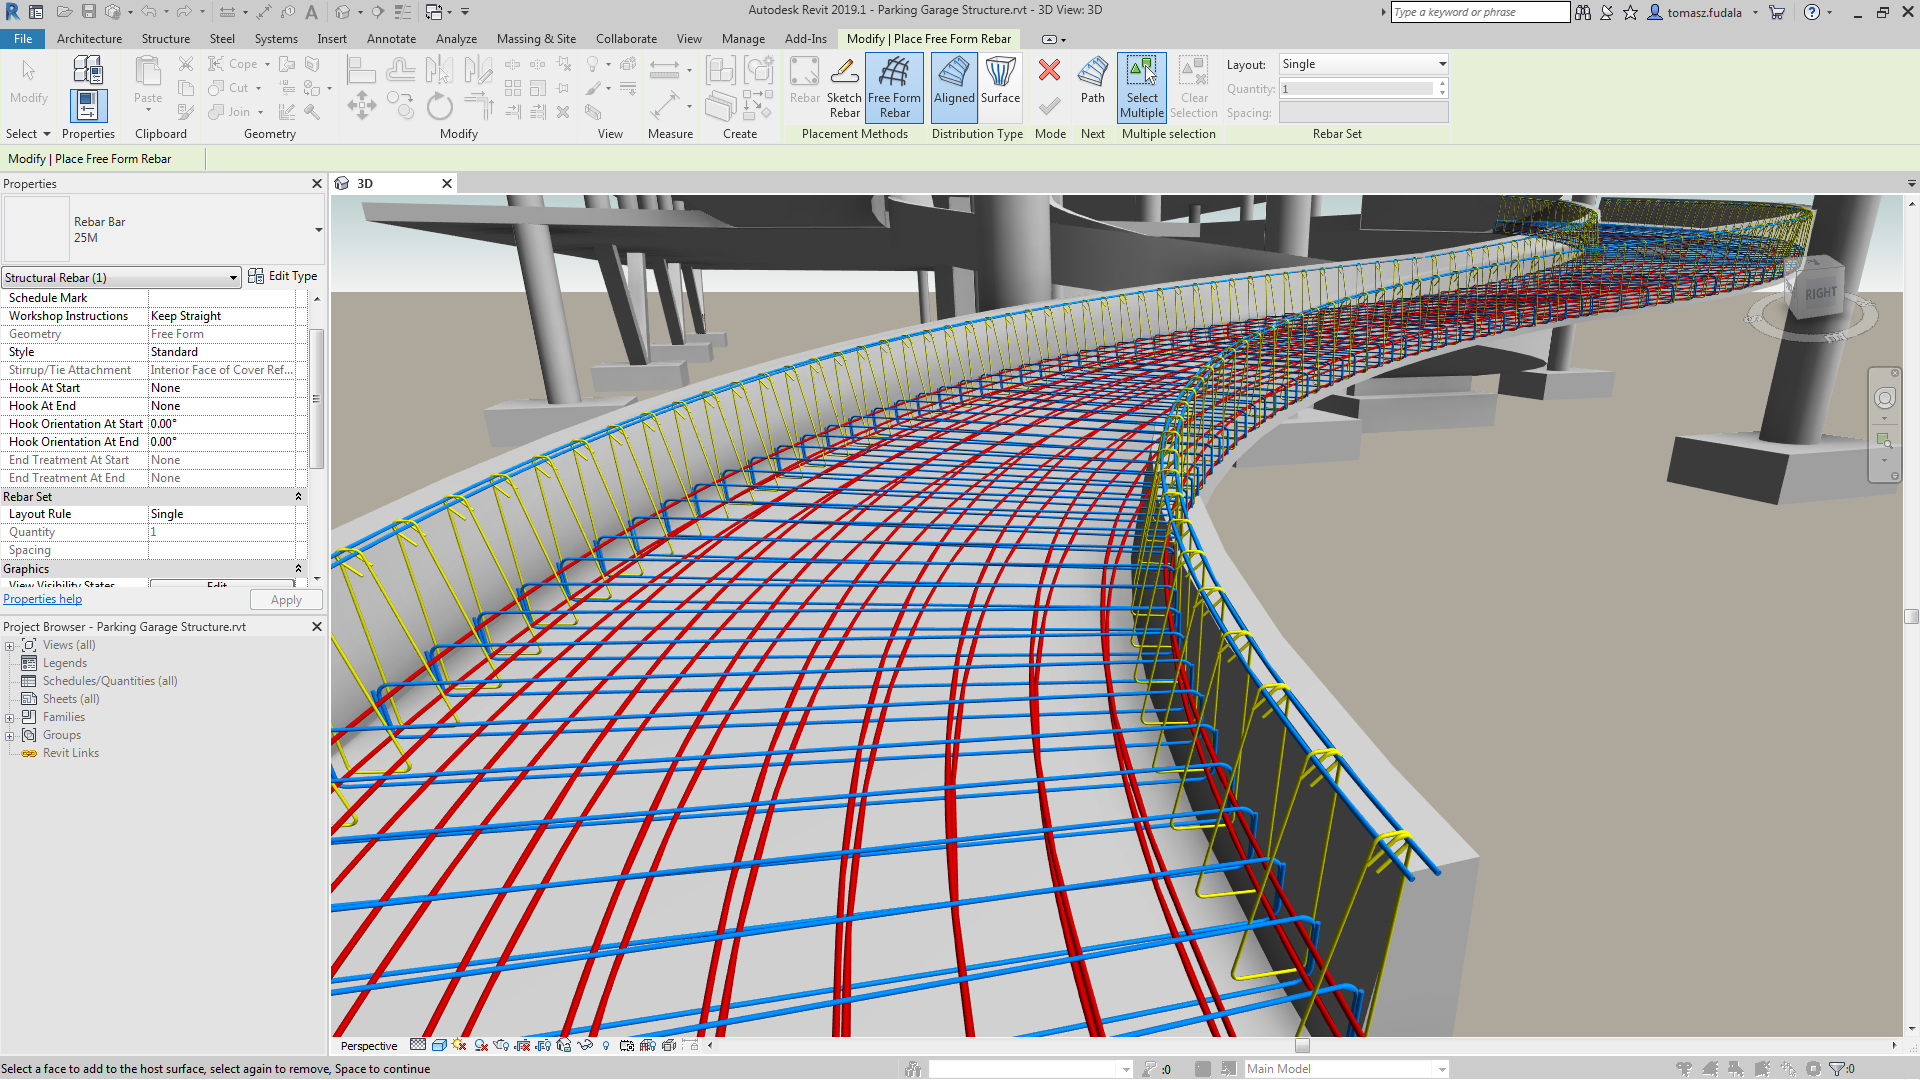
Just like with the surface distribution type, modeling of the aligned distribution type can be done by working in 3D views and selecting the structural element faces to align the bars.

  1. Simply click the Structure tab > Reinforcement panel > Rebar
    Then select the Modify | Place Rebar contextual tab > Placement Methods panel > Free Form Rebar > Modify | Place Free Form Rebar contextual tab > Distribution Type panel > Aligned


    Note: In 3D views, the Aligned Distribution of Free Form Rebar placement is launched by default when accessing the Rebar command.
  2. In the Type selector at the top of the Properties palette, select the desired rebar type.
    Optional: Select other properties like Layout Options, Style, Hooks, Workshop Instructions.
  3. Select the references that define the set. One reference can include one or more element faces.
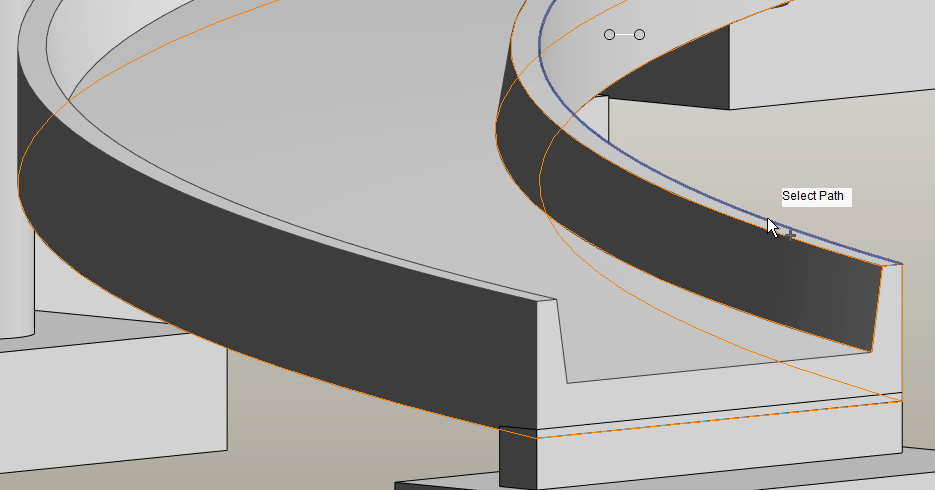
  4. Click the Path option  to define the distribution path.

Rebars in an aligned distribution are created at the intersection of each individual bar plane with the host surface. All the bars are planar, respect the cover of the host and are aligned to the distribution path.

The distribution path is the edge of an element that can host rebar. This can be selected directly when placing the set and represents the intersection of the faces in the Path Surface 1 and Path Surface 2 constraints.

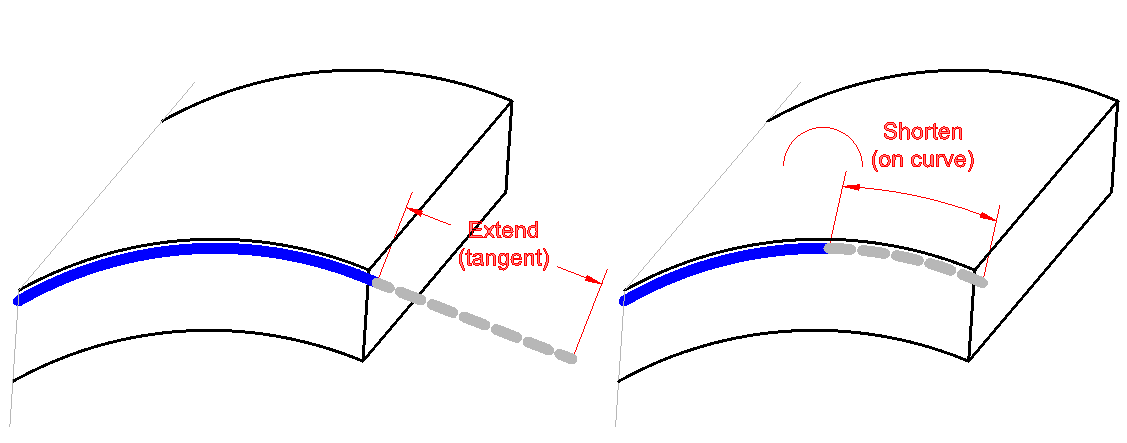
Apart from the references that you input during placement, free form rebar is automatically shortened or extended to the nearest faces that is part of the host. The shortening is done along the bar, while the extension is tangent to the end.

If the option to automatically close bars is enabled, then closed contour geometry can be obtained for each bar in an aligned distribution set. This option is enabled by default when placing a bar with the stirrup/tie style.

The rebars in the set can be aligned to the path (it’s the default option) or can be parallel to the face selected in the align / close constraint.

This new type of the free form rebar distribution increases 3D rebar modeling versatility and helps you define the accurate reinforcement for standard and non-standard shapes of concrete elements.

@tomekf

Learn more on Free Form Rebars in Revit:

Learn more on what’s new in Revit 2019.1 (link to Revit blog).


The post Free Form Rebar Aligned Distribution in Revit 2019.1 appeared first on BIM and Beam.


from my Autodesk source Bim & Beam: BIM and Beam at http://blogs.autodesk.com/bim-and-beam/2018/08/15/free-form-rebar-aligned-distribution-revit-2019-1/
via IFTTT

Wednesday 1 August 2018

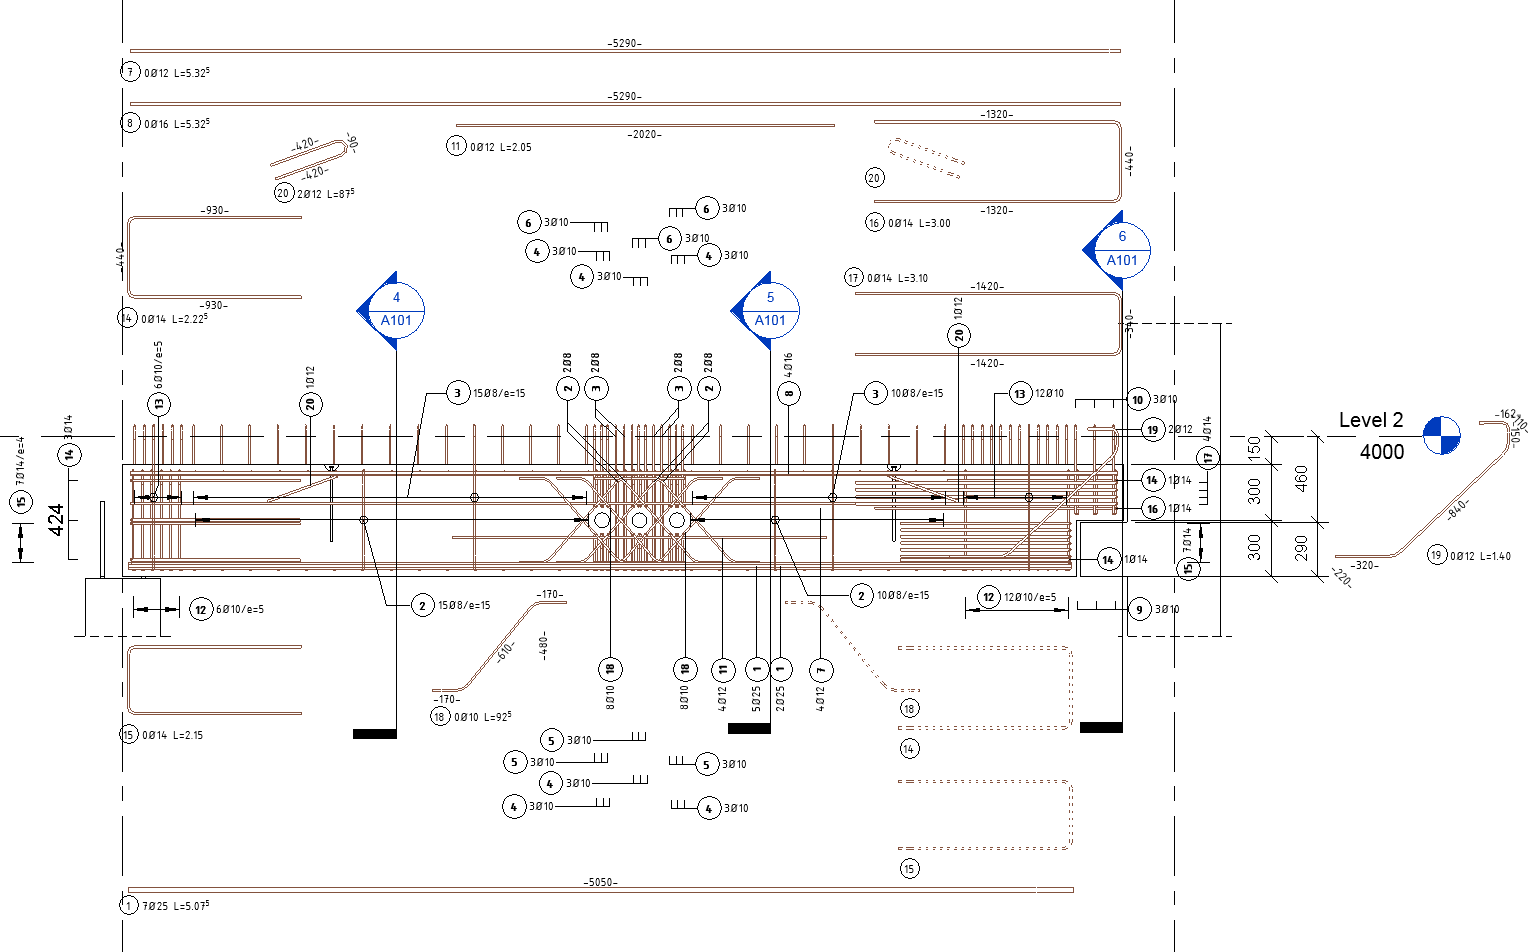
BIM for Reinforced Concrete – From Design to Detailing in One Model

This is the third blog post in a series that discusses the advantages of working on concrete projects in a BIM process for structural engineers.

Before we dive in, let’s quickly review the four benefits of BIM for engineers:

  1. Combines the versatility of 2D documentation with the higher level of fidelity and accuracy of 3D modeling of steel reinforcement and concrete accessories, with minimal effort to produce both.
  2. Allows users to design and detail with rebar clash prevention in mind to reduce clashes both in the preconstruction and site execution project phases.
  3. Enables the transition from design to detailed models while respecting both perspectives, following local code requirements, and automating the process of making changes so they are less disruptive to the design process.
  4. Increases transparency and quality of the model information being used from bidding to procurement by not only providing quantifiable information, but also enabling access to it in collaboration friendly environments.

This post will focus on the “how” of benefit three.

Benefit #3: The BIM-centric concrete solution enables the transition from design to detailed models while respecting both perspectives, following local code requirements, and automating the process of making changes so they are less disruptive to the design process.

Coordinating the design intent model with the detailed model has always been a factor of “bureaucracy,” since historically, structural engineers work with different software than other project stakeholders. Tools to import and export various file formats across software produced by different companies have been used for some time, but we believe simplicity and precision should be a key factor for coordination and will ultimately lead to a strong and reliable behavior of any structure during its lifecycle.

Take, for example, a precast concrete wall. Its length and height are dictated by its place in the building. Segmentation is dictated by engineering, architectural, or fabrication requirements, and its reinforcement is determined by the structural engineer.
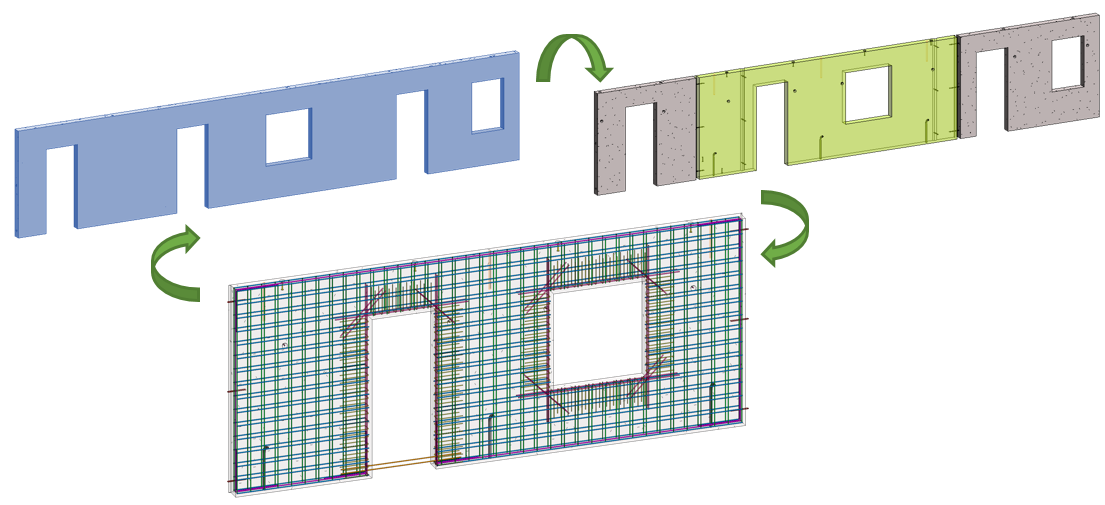
Revit-model-driven structural-analysis

Let’s assume a conceptual model is received from the architect. The structural engineer creates the analytical model and structural system. Revit has multiple tools for defining and editing the analytical model, or the model can be exported to various analysis software that are interoperable with Revit – including Robot Structural Analysis Professional – to perform structural analysis. The results can then be imported into Revit and reviewed to understand the impact of various design changes.

With the results now available in the Revit model, the rebar definition can begin. There are two approaches to this process – one for EMEA and the other for AMER.
Firstly, the structural engineer analyses the efforts and proposes reinforcement patterns, a practice typically encountered in North America. The engineer can use engineering schedules or place tags in 2D or 3D views that reference concrete elements and reinforcement patterns. Secondly, rebar can be determined more directly by structural analysis results, while respecting local design codes, a method usually embraced by European countries.
The beauty of Revit is that it allows for both approaches, enabling all structural engineers to work in a BIM environment connected to architects, MEP engineers, and the extended project team.

Code-driven automatic generation of reinforcement

With the “results packages” in the BIM model, code design tools can drive the automatic generation of reinforcement. Multiple types of concrete elements can be reinforced following the engineering design standards from various countries and regions.

SOFiSTiK Reinforcement Generation (RCG) automatically generates a 3D rebar model in Revit based on structural analysis input, and works with concrete beams, columns, floors, walls, and slabs. It follows the defined rules to generate the reinforcement to meet the required reinforcement criteria. Respecting various country or company standards can be done by controlling the rules files. Once the reinforcement is generated, it can be manually edited.

RCG offers real-time checking of the reinforcement directly in Revit 3D views. Using the “Check” command, the required and existing reinforcement in a framing element can be compared. If the reinforcement is adjusted, the diagrams react instantly, giving precise feedback to the engineer about how to optimize the reinforcement patterns.
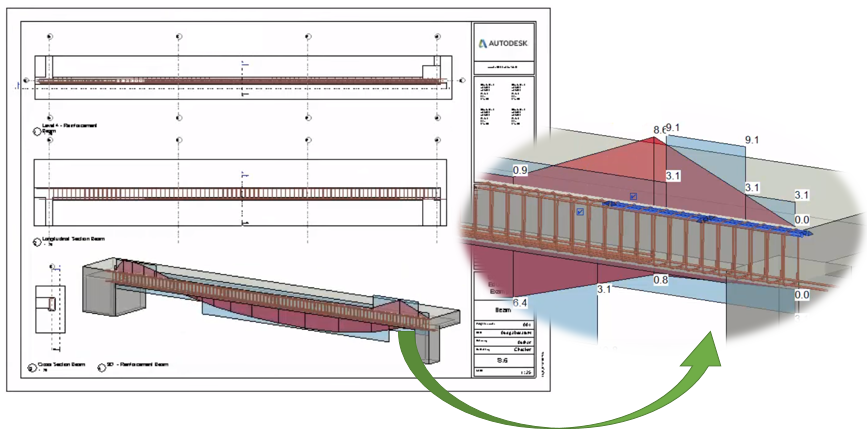
In a similar manner, the “Check section” command compares the existing reinforcement in user-defined sections of surface elements against the required reinforcement.
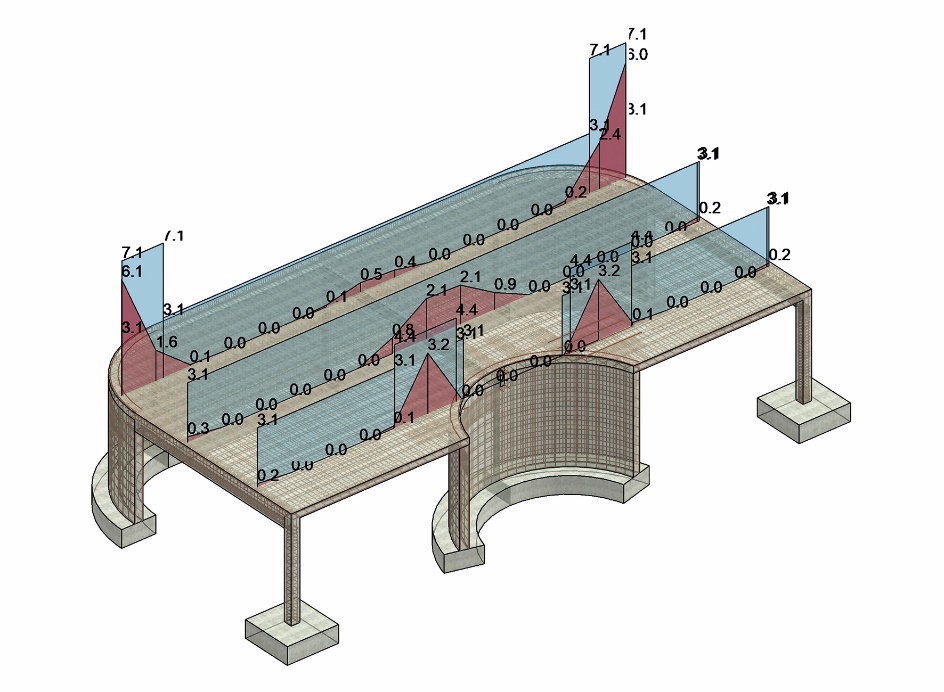
Once the rebar modelling is complete, detailing can begin. To comply with the same standards across this phase of the project, the SOFiSTiK Reinforcement Detailing tool can produce customized shop drawings and bar bending schedules.

Graitec Reinforced Concrete BIM Designers is another powerful tool that leverages Revit results packages to generate reinforcement in single-span and continuous beams, columns and isolated foundations. It is compliant with Eurocode 2, US ACI 318-14, and Canadian CSA standards. The various settings allow the use of specific bar diameters and other constructability rules, like the maximum number of bars to be placed in a concrete element according to its width.
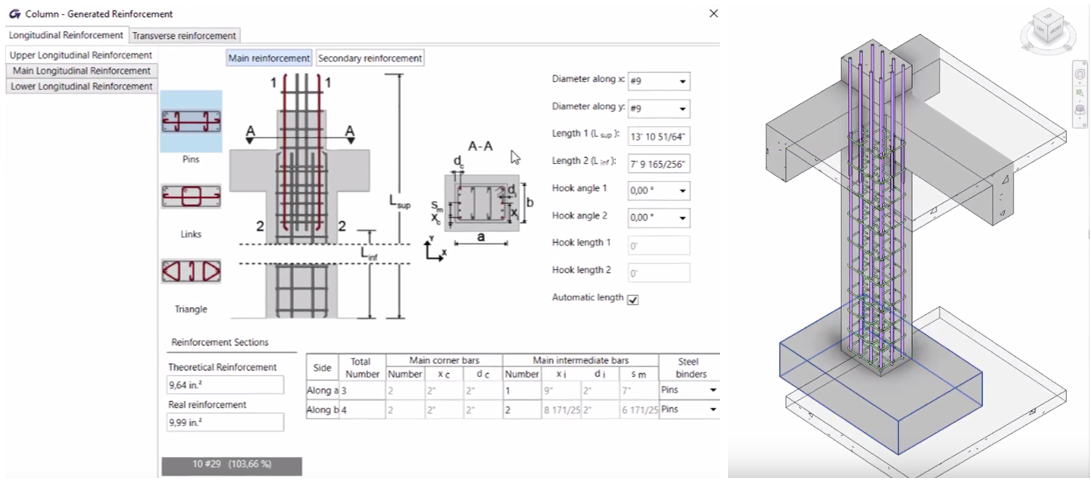
The tool also calculates a group of identical elements simultaneously so that they have the same rebar cages, based on the theoretical reinforcement envelope for the entire group. There is also the ability to save reinforcement cage templates which can be applied to similar elements and adapt to their new hosts based on predefined rules.

The app also generates engineering design reports. The content of each design report depends on the country-specific template and can be configured by the user. A fully comprehensive design report describes the theoretical formulas and values used in the calculation process according to the country selected, and includes the results and work ratios for each verification.
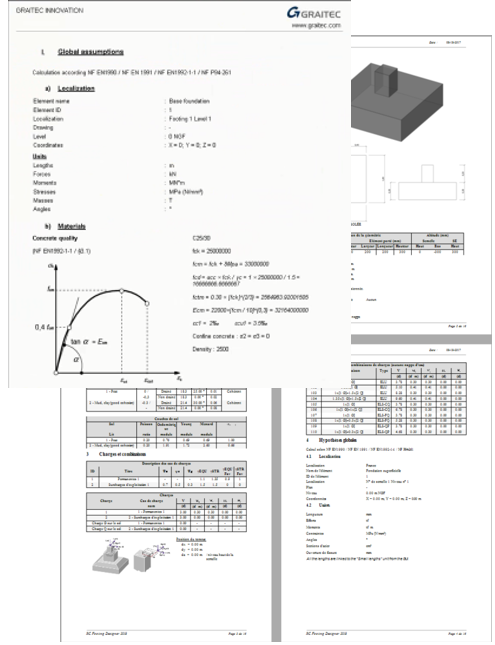
Customizable bar bending schedules and automatic shop drawings based on predefined templates can be created using the app’s dedicated features.

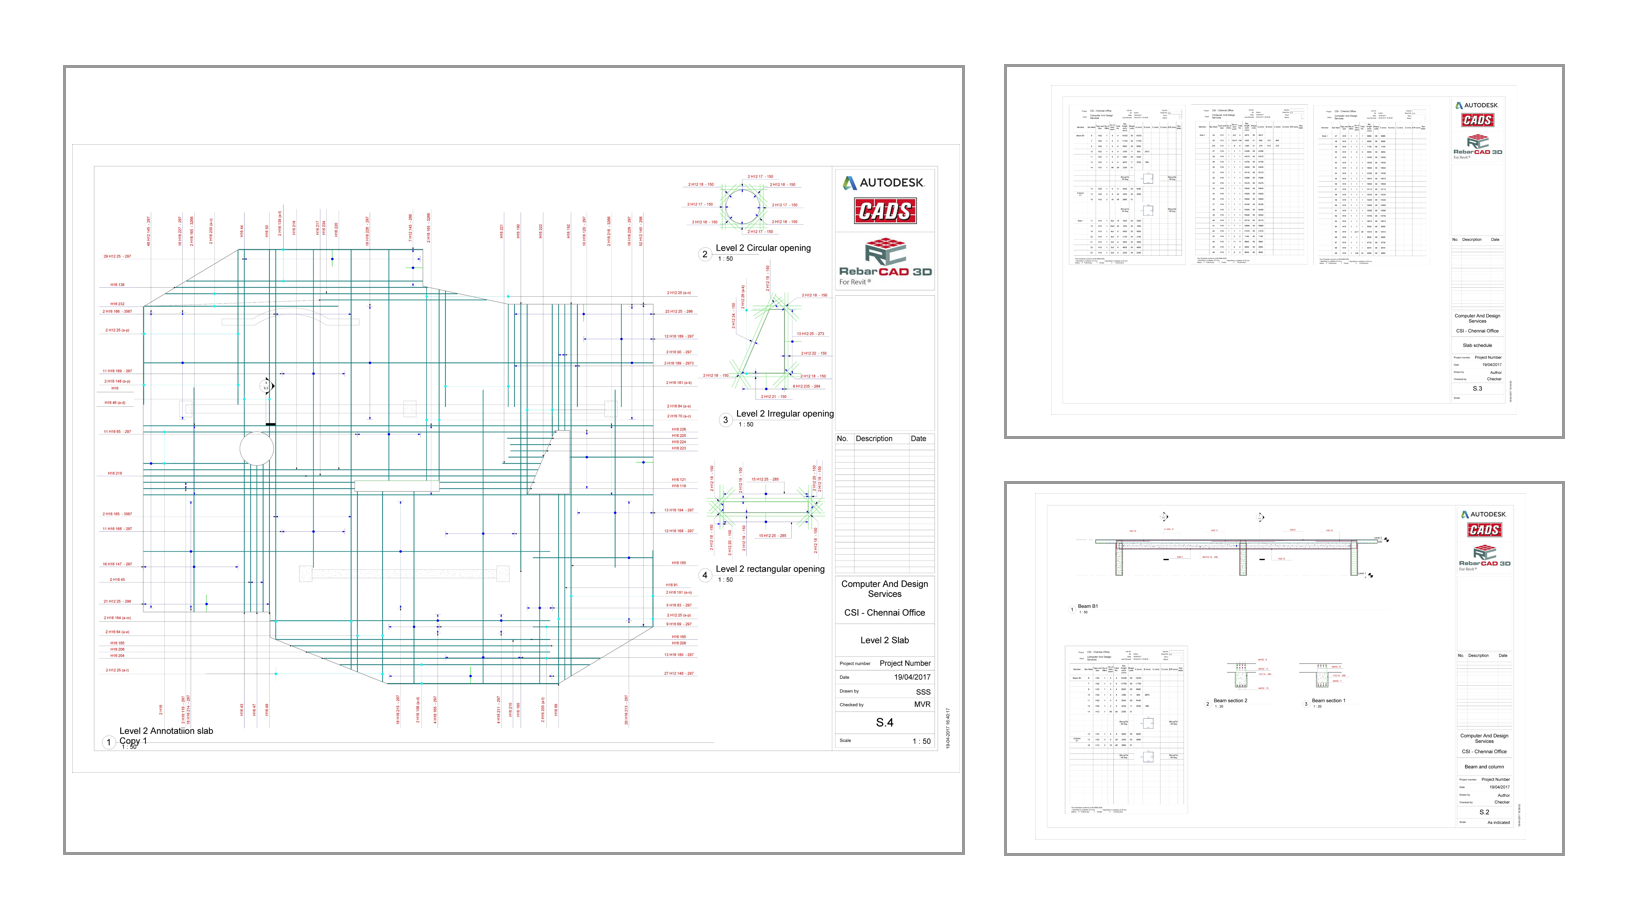
CADS RC3D has been designed to enhance the placement, annotation, and bar marking of rebar in 3D structures. The software provides functionality to create 2D detail drawings and bar bending lists to country standards. Features of the app include:

  • Annotation functions to detail tapered ranges and mark rebar ends
  • Enhanced layering tools to split rebar into zones within a structure
  • Editing functions to copy rebar from one structure to another
  • Path placement functions to allow the rebar to be placed parallel to another rebar in the structure
  • Managing the rebar according to assigned structure, release, and drawing sheet
  • Custom rebar lists

One Source of Truth

Given that the above steps can be completed in the same model, it is easy to see the benefit of having one source of truth and using Revit as the single platform for design and detailing.

Since many reviews occur during the design phase, we can expect many changes to the geometry of the concrete elements. Normally, this could lead to significant manual changes to the reinforcement, but because Revit’s reinforcement is constrained to the concrete elements, it means it adapts automatically every time.

And not only is the rebar in-sync with the concrete structure, it can also be modelled in its finest details to achieve a clash-free model, ready to be sent to fabrication and installed on site.

Having always up-to-date and coordinated structural analysis results, rebar models, engineering design reports, bar bending details, bar schedules, and shop drawings will ultimately lead to successful project delivery.
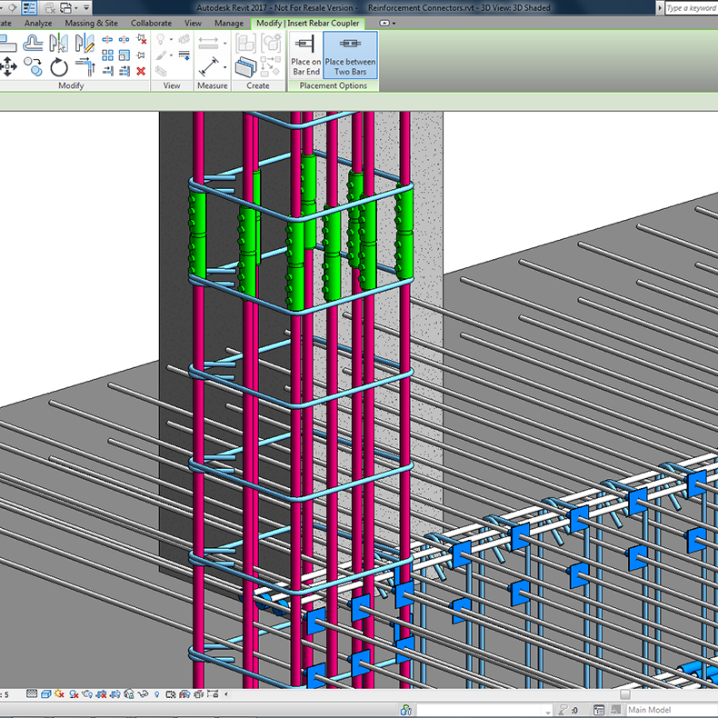
To learn more about how customers are using these tools and solving complex challenges, you can visit the Revit Structure Forum and join a community of structural professionals.

The post BIM for Reinforced Concrete – From Design to Detailing in One Model appeared first on BIM and Beam.


from my Autodesk source Bim & Beam: BIM and Beam at http://blogs.autodesk.com/bim-and-beam/2018/08/01/bim-for-reinforced-concrete-from-design-to-detailing-in-one-model/
via IFTTT
Tuesday 24 July 2018

SOFiSTiK Reinforcement Detailing 2019 is now available

SOFiSTiK Reinforcement Detailing significantly accelerates the creation of 2D reinforcement sheets from 3D models in Autodesk Revit. The product consists of software and a set of families, which can be modified to meet local or company standards. Easily create bar lists, bending schedules, and cut lists for wire meshes.

Last month SOFiSTiK Reinforcement Detailing 2019 became available:

https://apps.autodesk.com/RVT/en/Detail/Index?id=5946592685708823524&appLang=en&os=Win64


With the latest SOFiSTiK Reinforcement Detailing 2019, you‘ll experience increased productivity and performance, thanks to these new features:

  • All Shapes tool to place all shape details together in a drawing view.
  • Enhanced DOCX reinforcement schedule for varying rebar sets, a new cut list for fabric sheets, and more.
  • Warning Workflow to check and find the corresponding elements in the project.
  • Consistent support of free form rebars, and new shapes for column corbels and beam supports.
  • Bending machine interface in BVBS format.
  • Tendon Workflow
  • Tag and Detail tendons
  • Differentiation of „Male/Female“ for Coupler
  • Split tool support for rebar arcs and rebars in various levels.
  • Copy reinforcement into multiple elements with annotation, details, and dimensions.
  • Tag placement settings for the detailing tools (e.g. Hide and Tag).
  • Browse tool highlights all corresponding shapes and details.
  • Workflow/Productivity > Support of RETURN/SPACE to finish selection

Get started by watching the following video:

You can also download a 30-day trial of these tools from the Autodesk App Store.


The post SOFiSTiK Reinforcement Detailing 2019 is now available appeared first on BIM and Beam.


from my Autodesk source Bim & Beam: BIM and Beam at http://blogs.autodesk.com/bim-and-beam/2018/07/24/sofistik-reinforcement-detailing-2019-is-now-available/
via IFTTT
Monday 18 June 2018

The MEP and Structural Fabricators Forum Joins Forces with AU

If you’ve been a part of the MEP and Structural Fabricators Forum in the past, you know what a unique event it is—a place to learn how technology is changing the game for those who detail and fabricate MEP and structural systems. The knowledge and insight you can gain there is hard to find anywhere else. Plus, it brings a singular opportunity to connect with other contractors, subcontractors, designers, engineers, and fabricators from around the country and around the world. It’s a chance to learn how your industry is advancing from the people who are leading the charge.

This year will be more valuable than ever. That’s partly because we’re integrating the Fab Forum (as we like to call it) into the broader AU experience.

What Does This Mean for You?
If you’re an attendee, this means you’ll have more flexibility in how you plan your learning experience in Vegas, and how you connect to the larger community that gathers there. With a 1-day or 3-day AU pass, you’ll also be able to attend other AU sessions and keynotes and participate in AU networking events. The goal is make the entire experience more about you and what you need.

As for speakers, it means you’ll be better able to mix with other thought leaders at AU, share your industry and product expertise, and have a more seamless collaboration with the AU team.

Stay tuned over the coming weeks for more about how you can maximize your experience during AU.

Preconference Learning Continues
While the Fab Forum is becoming part of the larger AU this year, we’re continuing to offer preconferences for other specialist communities that are leading the way in industry. The Computational BIM Workshops, the Connect & Construct Summit, and Forge DevCon will all help kickstart AU Las Vegas in 2018. And for those interested in the Fab Forum, the Connect & Construct Summit will be of particular interest.

It’s Vegas or bust, people. We’ll see you there.

The post The MEP and Structural Fabricators Forum Joins Forces with AU appeared first on BIM and Beam.


from my Autodesk source Bim & Beam: BIM and Beam at http://blogs.autodesk.com/bim-and-beam/2018/06/18/mep-structural-fabricators-forum-joins-forces-au/
via IFTTT
Friday 8 June 2018

Rebar in Revit: Power up your productivity with BIM Designers

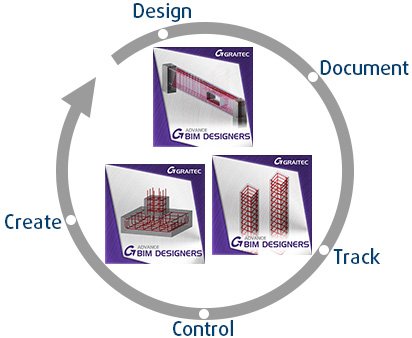
Advance BIM Designers is a BIM Solution for improving structural project management. It helps users to create, design, document, track and control structural members of a BIM project whilst also working in multiple BIM environments.

GRAITEC Advance BIM Designers – Concrete Series is an innovative series of applications for rebar detailing and modeling using engineering BIM data.

PowerUp your productivity in Revit to the Next level and manage your rebar project in the most effective way with BIM Designers, an add-on made by Graitec. You can easily handle complex geometry features in Revit: create an opening around pipes, a depressure within few clicks using an intuitive and easy user interface.

You can also apply reinforcement wizards to define the geometrical parameters and generate the 3D rebar cages on beams, columns, footings.

Discover more on Reinforced Concrete Designer page: https://www.graitec.com/advance-bim-designers/reinforced-concrete-designer/


The post Rebar in Revit: Power up your productivity with BIM Designers appeared first on BIM and Beam.


from my Autodesk source Bim & Beam: BIM and Beam at http://blogs.autodesk.com/bim-and-beam/2018/06/08/rebar-revit-power-productivity-bim-designers/
via IFTTT
Monday 7 May 2018

What’s new in Advance Steel 2019

advance-steel-2019-badge

We’re excited to announce the latest release of Autodesk’s structural steel detailing software, Advance Steel 2019.

advance-steel-2019-badge

Here is a highlight of the main new and enhanced features available in this version.

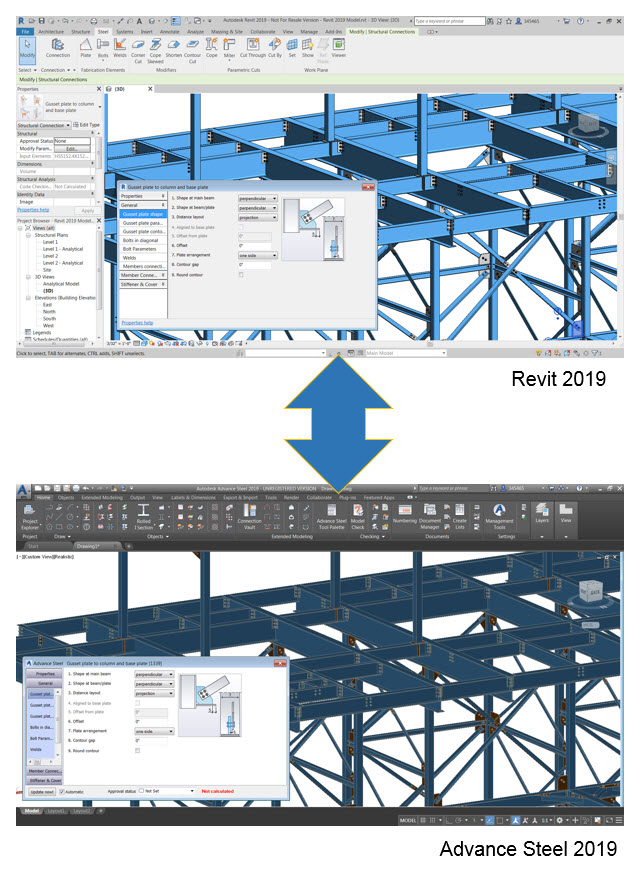
1 – Enhanced interoperability with Revit 2019

The Advance Steel 2019 Extension for Revit 2019 transfers steel members and steel connections to Advance Steel 2019. Not only are the parametric steel connection being transferred between the two products, but also individual components of custom connections such as plates, bolts, anchors and welds. This enhanced workflow helps steel detailers and fabricators to take better advantage of the steel model designed in Revit. Read more about the Revit 2019 features for steel here.

Interoperability-revit-advance-steel-2019

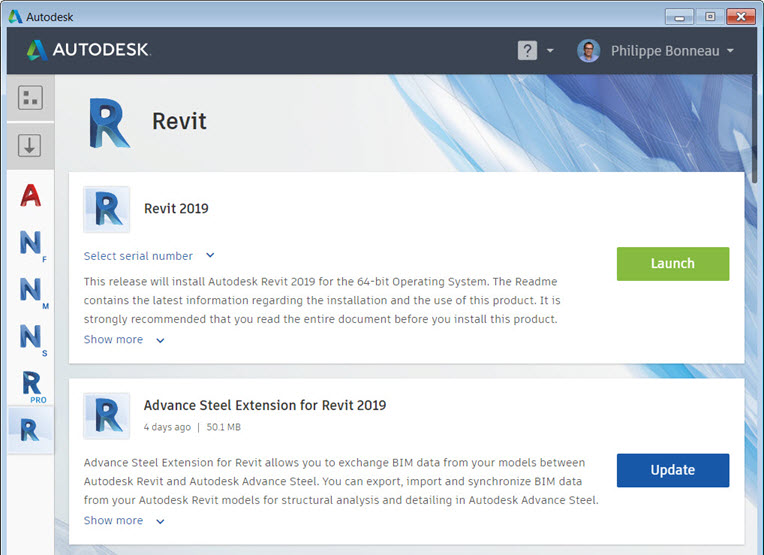
Remark: the Advance Steel 2019 Extension is a separate extension downloadable from the Autodesk Desktop App (see picture below), you can also find it in your Autodesk Account at manage.autodesk.com.

2 – Migrate custom settings tool enhancements

The Migrate Custom Settings tool offers a modern and informative interface for migrating your custom settings and files from a previous release to Advance Steel 2019. It helps detect and identify customized settings and enables you to choose which ones you would like to migrate.

This release offers more migration options with personalized settings such as mapping definition, customized symbols, approval comments and status, and much more.

3 – New tool for fabricated anchors

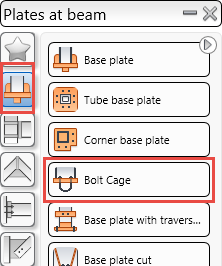
Advance Steel 2019 comes with a new dedicated “Bolt cage” tool (available in the Connection Vault) to insert customized fabricated anchors to your base plates.

advance-steel-201-bolt-cage-tool


The addition is for those of you who like to fabricate your own Anchor Bolts as opposed to purchasing them off the shelf.

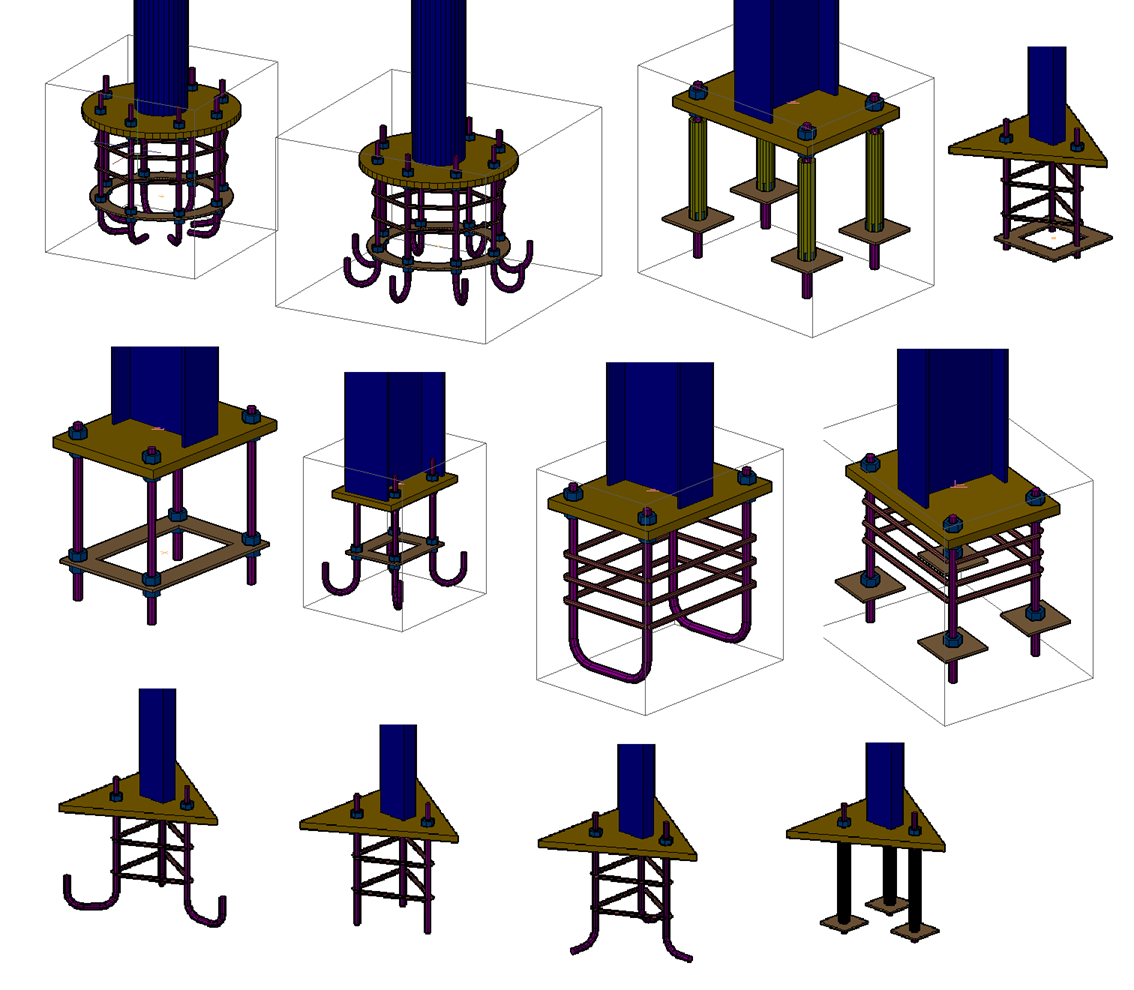
The properties dialog allows to define these custom anchors with various shapes, sizes, complete with Tie Bars/Tie Plate and Washer possibilities.

In total there are 11 variations. Including Rectangular, Triangular and Circular options for arrangements.

advance-steel-2019-bolt-cage-examples

Read more about this new Advance Steel 2019 feature here.

4 – Display horizontal grid lines on elevation views

If your 3D model contains grid lines on distinct levels, you have the ability to display these grid lines on the elevation views of your drawing.

For that, you need to activate the default “Display horizontal grid line in details” option which is available in the Management Tools, before creating the view on the drawing.

When inserting a vertical dimension to this grid line on your drawing, you can snap to “Preferred for manual dimensions” snap point to get smart dimensions which will adjust automatically in case the dimensioned grid line gets moved in the project.

5 – Enhanced drawing update behavior

In Advance Steel 2019, the drawing update behavior has been enhanced for smart dimensions.

Prior to these enhancements, there were some cases when dimensions got moved to another location during a drawing update. In this release, smart dimensions remain in place during a drawing update.

Also the compass symbol remains in place and keeps the style that has been assigned to it when the drawing gets updated.

6 – More control on cut views on drawings

You can easily create a cut view in Advance Steel.
The size of cut views now corresponds to the dimension between the two points picked when defining the cutting plane on the main view.

This helps having more clarity on shop drawings and general arrangement drawings.

7 – Easily share your 3D model within or outside your organization

The Shared Views feature makes it easier for you to share your Advance Steel designs with stakeholders, without sending your DWG files to them.

From the new Collaborate tab on the ribbon, you can display the Shared Views palette in Advance Steel.

After the processing is complete and the shared view has been uploaded to the cloud, a bubble notification displays on the status bar and you can get the temporary link to share with others.

Stakeholders can view, review, measure, comment, and markup the 3D view, get access to Advance Steel object properties, using Autodesk Viewer inside their web browser.

In Advance Steel, you can refresh the Shared Views palette at any time by clicking the Refresh button; and see the latest comments and other information.


See how some of our customers are using Advance Steel on their projects:

  • Complex steel structure project at Guilin International Airport: read the story
  • New Bulgari factory in Valenza, Italy: watch out for this video
  • Louvre museum in Abu Dhabi, UAE: learn more with this customer success story
  • New operational support building at Regina Airport, Canada: discover the project by reading this article
  • The Lucas residential development in Boston, USA: check out this blog post
  • Imperial Beach branch of the San Diego County Library, USA, learn more on BIM & Beam

The post What’s new in Advance Steel 2019 appeared first on BIM and Beam.


from my Autodesk source Bim & Beam: BIM and Beam at http://blogs.autodesk.com/bim-and-beam/2018/05/07/whats-new-advance-steel-2019/
via IFTTT
Monday 30 April 2018

Overview of BIM 360 Design

BIM 360 Design is Autodesk’s cloud worksharing, design collaboration, and data management product for improved project delivery. It joins the unified BIM 360 portfolio with a familiar composition — it enables the same Revit cloud worksharing that you’ve come to love in Collaboration for Revit, except that this worksharing functionality is now also built on the new BIM 360 platform. It includes a new “Design Collaboration” module in the new platform that was developed to make BIM management and design deliverable coordination on projects a whole lot easier.

Altogether, BIM 360 Design has these components:

  1. Revit Cloud Worksharing for multi-user model co-authoring (available both on next generation BIM 360 and also with BIM 360 Team as you have been doing in Collaboration for Revit*).
  2. Document Management module for data management, access controls, and web and mobile collaboration
  3. The new Design Collaboration module for milestone tracking and deliverable coordination
  4. Other administration modules for account and project setup (for more information, please read the Getting Started guide)
  5. Autodesk Desktop Connector, to connect your cloud repository to your desktop.

Learn more:

The post Overview of BIM 360 Design appeared first on BIM and Beam.


from my Autodesk source Bim & Beam: BIM and Beam at http://blogs.autodesk.com/bim-and-beam/2018/04/30/overview-bim-360-design/
via IFTTT
Thursday 26 April 2018

The Precast Show

I just had the opportunity to attend The Precast Show 2018 in Denver this March. This year’s event showcased a lot of new types of technologies that definitely warrant sharing in a blog post. I also must confess, I cannot pass up any opportunity to talk about precast concrete.

There was a lot more buzz at the conference this year around technology, especially in the areas of precast factory automation. With labor shortages plaguing the construction market at large, the precast industry is also impacted by the difficulty in finding qualified workers. The most common way that manufacturers are adapting to the labor shortage is by investing more in robotics and other automation technologies. Technologies provided by companies like Progress have been automating fabrication processes in Europe and Asia for several years now. This level of adoption of fabrication has taken awhile to grab hold in the US and Canada, but I am confident those markets are on the cusp of moving to these solutions.

Partner solutions moving to the cloud

One exciting technology that I saw was from PTAC our industry partner. They showcased the latest precast detailing capabilities for Revit using their EDGE for Revit. They also revealed some new AR/VR technology with DAQRI while touring a precast factory in Denver, CO. They started investing in the cloud a few years ago as more of their customers needed a better way to connect the design office to the factory and field. Their customers were using Revit to produce the shop deliverables digitally. But they weren’t truly leveraging the digital data in the factory to improve quality and productivity.  Therefore, PTAC began investing in the cloud and connecting their cloud technology to . They did this to better connect Revit precast assembly information in 3D to the factory to the office and field.

What is fascinating about this technology is that is gives a glimpse into the future of digitizing factory work. PTAC and DAQRI’s vision is that precast workers will be able to use digital information to improve the quality of their inspections, coordination and communication. The cloud is here and Augmented Reality investments are sky rocketing across many industries. As that continues I expect the cost of AR/VR hardware to drop, making applications like this very practical to implement.

I think it is great to see PTAC leading the industry here with what they showed. To learn more about their technology here:

https://www.edgeforrevit.com/

At the show, technology vendors IDAT and  AGACAD who also presented their Revit-based precast detailing solutions.  IDAT provides ERP solutions for precast producers as well as services to customize Revit to drive the detailing process.  AGACAD provides precast and timber design solutions for both MEP and Structure professionals worldwide and have a nice precast solution using their novel Smart Assembly technology to automate precast production in Revit.

To learn more about the latest Autodesk BIM technologies available for precast concrete, check out Tomasz Fudala’s posts here. You will learn about the use of Revit, Dynamo and the new precast extension called Structural Precast for Revit.

The post The Precast Show appeared first on BIM and Beam.


from my Autodesk source Bim & Beam: BIM and Beam at http://blogs.autodesk.com/bim-and-beam/2018/04/26/the-precast-show/
via IFTTT
Wednesday 11 April 2018

Learn What’s New in Revit 2019 for Structural Engineers and Detailers

Building on Autodesk’s strategy to make Revit a robust model authoring tool for designing and detailing, the Revit 2019 release includes a number of new features that increase modeling versatility, accuracy, and productivity for engineers and detailers. We’re excited to share these features with you—take a look!

Detailed Steel Design

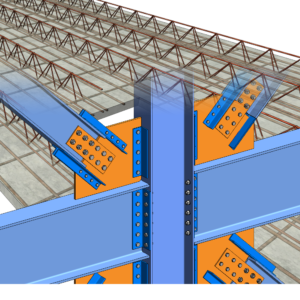
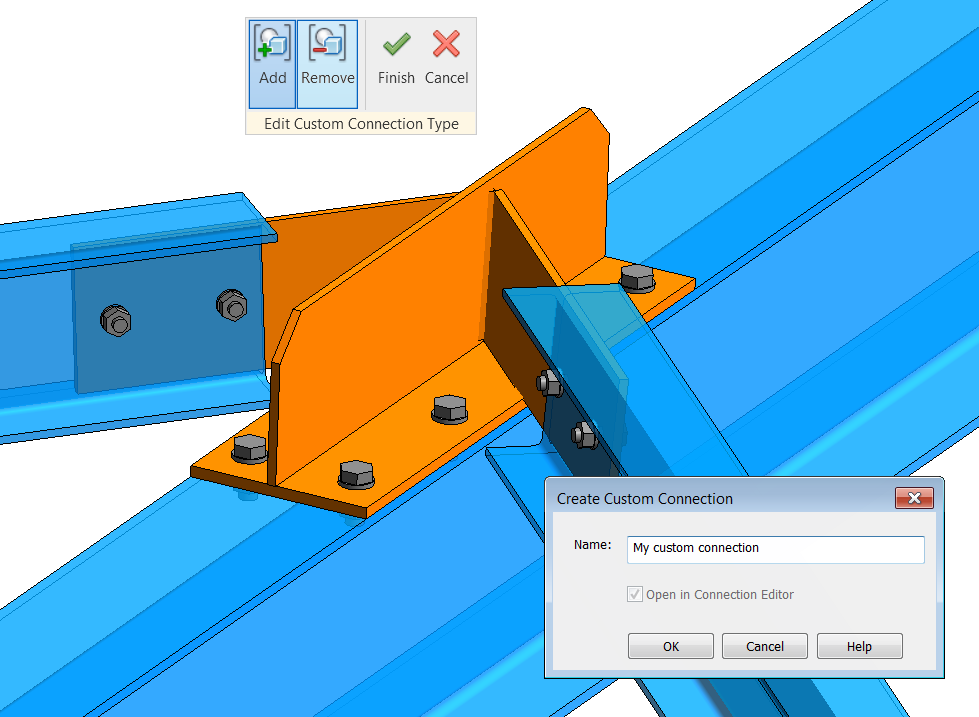
Revit users can easily modify structural framing and column elements using new edit tools and apply custom parametric cuts to better accommodate the geometry of elements for a steel connection. Steel components like plates, bolts, anchors, shear studs, and welds can now be placed in the 3D model to connect structural members together.

Having a more accurately defined design model in Revit also enables a better interoperability with Advance steel for steel detailing and fabrication.

Benefit: This new functionality gives you greater flexibility in modelling simple and complex steel connections in your structural steel design.


Standard and Custom Connections

With Autodesk® Revit® 2019 users can perform detailed steel design with out-of-the-box access to a comprehensive library of 125+ parametric connections including the creation of custom connections. There is no more need to install the separate Steel Connections for Revit® add-in as with previous releases.

Benefit: This allows structural engineers and designers to design steel connections with a higher level of detail within the Revit environment. Also it allows you to create your own steel connections and store them for later reuse to improve your productivity.


Documentation with steel details

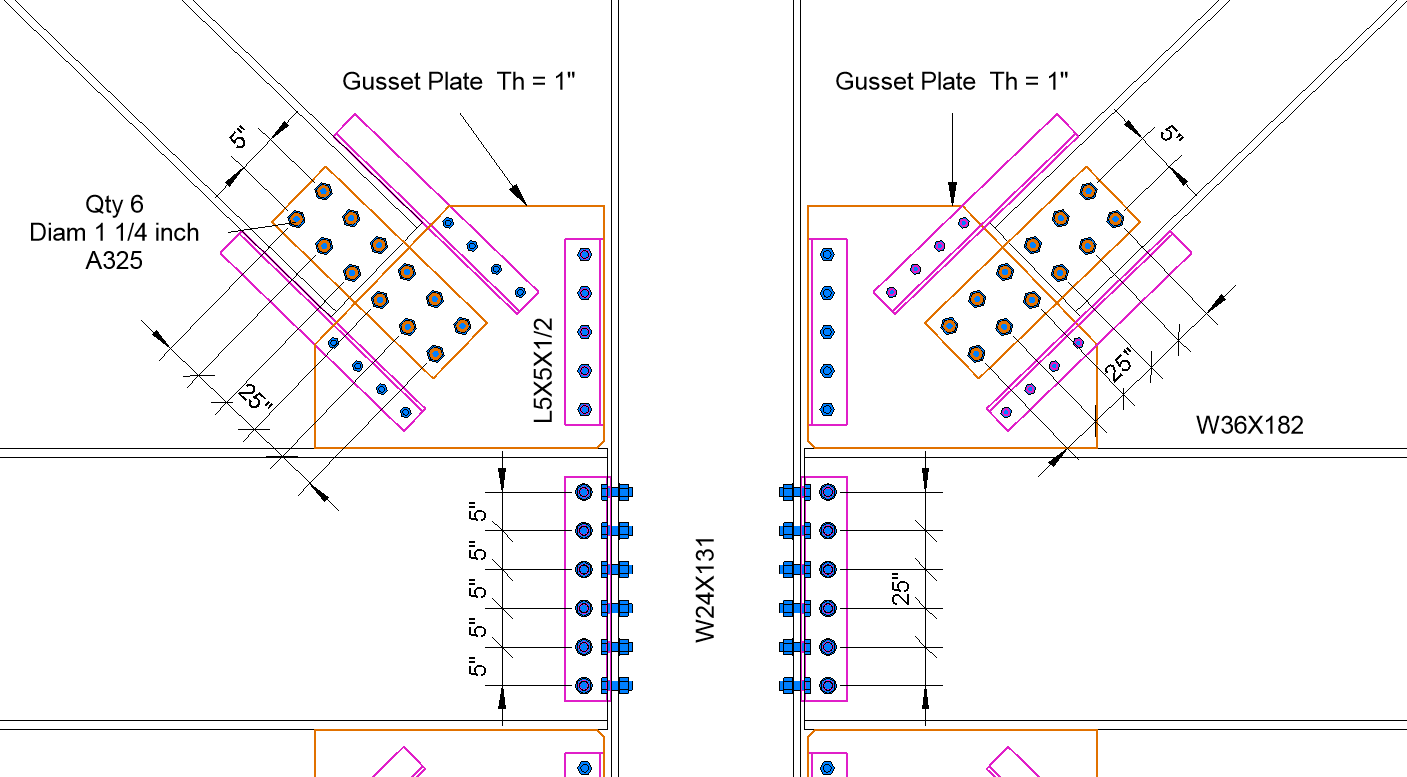
You can use a set of dedicated tools to create precise and detailed engineering drawings where steel connections are represented accurately.

These structural drawings are easily created complete with dimensions, tags & schedules.

You can get a better understanding & evaluation of steel components with accurate schedules automatically generated out of the 3D model. These schedules can include information for steel elements such as beams, columns and also bolts and plates.

Benefit: This feature allows you to deliver documentation which includes details and schedules for components of structural steel connections.


With detailed steel design capabilities in Revit, structural engineers can create new types of engineering documentation, perform BIM-based connection design, and produce more accurate bills of material (BOMs). This streamlines work processes by enabling better collaboration between structural engineers, connection engineers, detailers and fabricators in different locations.

Detailers can benefit by better coordinating with engineers and contractors and manage the changes coming from design. They can also extend their BIM-based services into preconstruction and reuse BIM-based model information directly from engineers to eliminate work.

Fabricators can benefit by receiving very accurate quantities for bidding purposes through accurate Revit design models. They can also eliminate waste in the shop and field by using the BIM environment to better coordinate their connection design to optimize for fabrication.


Free form rebar shape matching

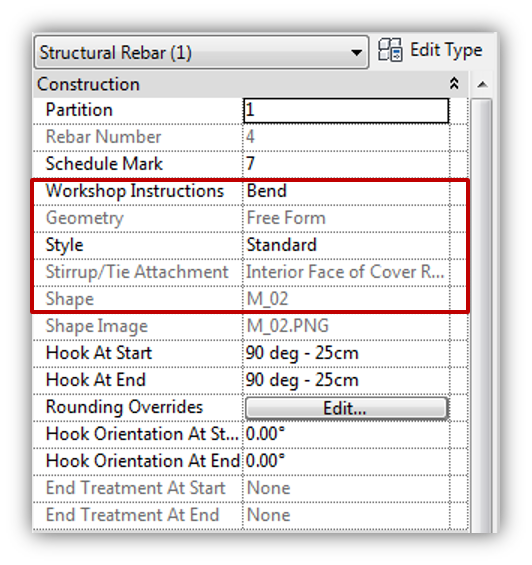
To improve scheduling and annotation of rebar in your documentation, free form rebar now either matches existing rebar shape families or creates new rebar shape families from its bar geometry.

This is done for each bar in the set individually and allows fabrication data like individual bar segment lengths and hooks to be extracted. The geometry of free form rebar is defined by the selected references, and if possible matched to a rebar shape family.

Use the Workshop Instructions parameter to specify how a free form rebar will be fabricated and you’ll be able to choose between “Straight” and “Bend.” Straight means that the bar will be delivered as a straight bar to the site, and the shape code is of the first straight rebar shape loaded into the project, like 00. Bend means that, if possible, the bar will be matched to an existing rebar shape or a matching one will be created.

Rebar numbering and assembly matching as well as all other properties of the structural rebar category make use of the shape information (shape codes and segment lengths) when dealing with a free form bar matched to a rebar shape family.

Benefit: This feature has been introduced to better communicate design intent, fabrication data in the form of bar bending schedules showing individual segment lengths, and shape codes when using planar free form rebar. All to enhance 3D modeling and communication of fabrication instructions.


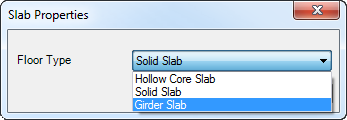
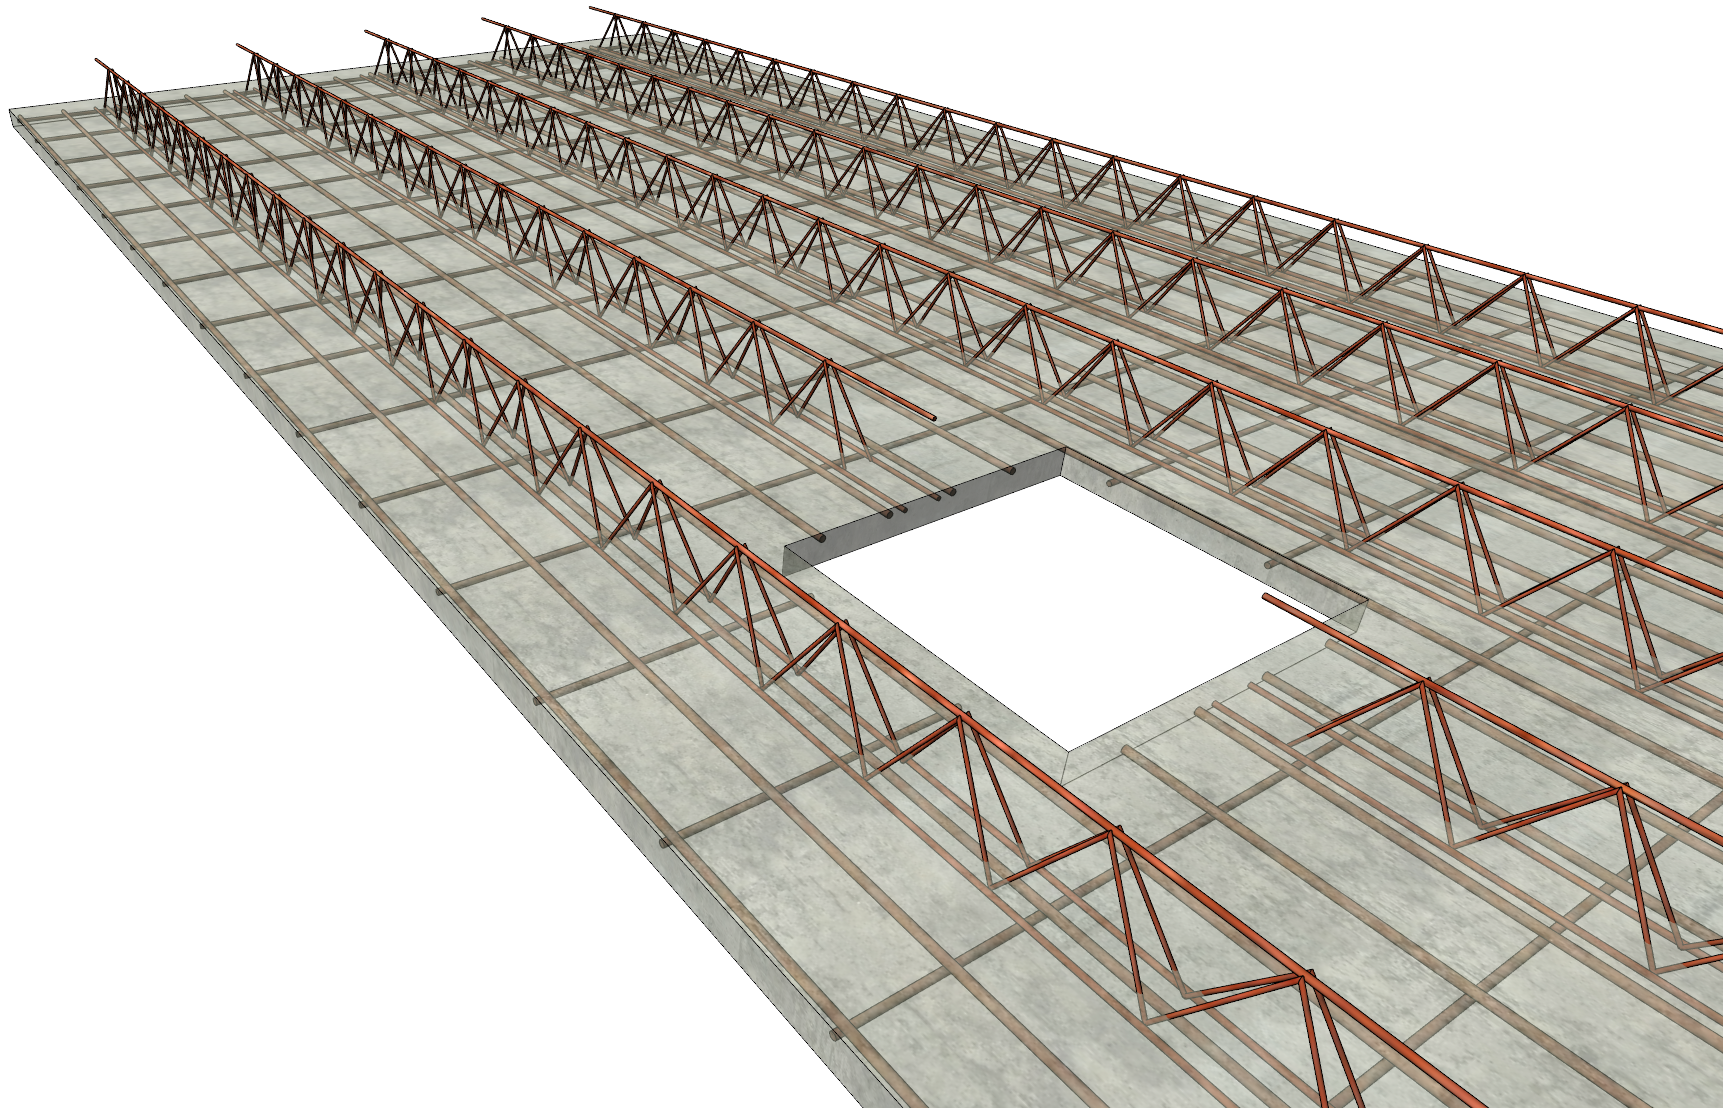
Precast automation for lattice girder slabs*

Girder slabs are now part of the precast automation process, following similar configuration rules and workflow as the existing elements. They are part of the Structural Precast Extension for Revit 2019 add-on .

Now you can find the ability to perform segmentation into girder slabs and add reinforcement according to predefined rules so you can automate the whole process of modelling precast girder slab assemblies. Furthermore, this feature can be used in conjunction with the Shop Drawings and CAM Export features so you have a seamless coordination from design to fabrication.

Benefit: This functionality gives you an enhanced and automated design to fabrication process.

API for precast automation*

The Precast for Revit dedicated API allows bespoke configurations for modelling, like segmentation or reinforcement rules, position of lifters and connections, also bespoke documentation, like custom annotation styles, or multiple shop drawings for an assembly with one click, or customized numbering.

Benefit: This empowers structural precast support and complements the Revit platform.

*Part of the Structural Precast Extension for Revit 2019 add-on, available later in May 2018 via the Autodesk Desktop App.

Learn more on what’s new in Revit 2019.

@tomekf

The post Learn What’s New in Revit 2019 for Structural Engineers and Detailers appeared first on BIM and Beam.


from my Autodesk source Bim & Beam: BIM and Beam at http://blogs.autodesk.com/bim-and-beam/2018/04/11/whats-new-in-revit-2019-structure/
via IFTTT
Wednesday 14 February 2018

Advance Steel Tips, Tricks, and Workflows You’ll Want to Try at the Office

Autodesk University 2017

When you think Autodesk University, you probably think about learning the latest trends and technologies but also tips & tricks on your favorite products. And that’s just what you’ll find!

For this post, I’m going to summarize some of the Advance Steel tips and tricks that I described in my class “Advance Steel Tips, Tricks, and Workflows You’ll Want to Try at the Office” during the Autodesk University MEP & Structural Fabricators Forum 2017.

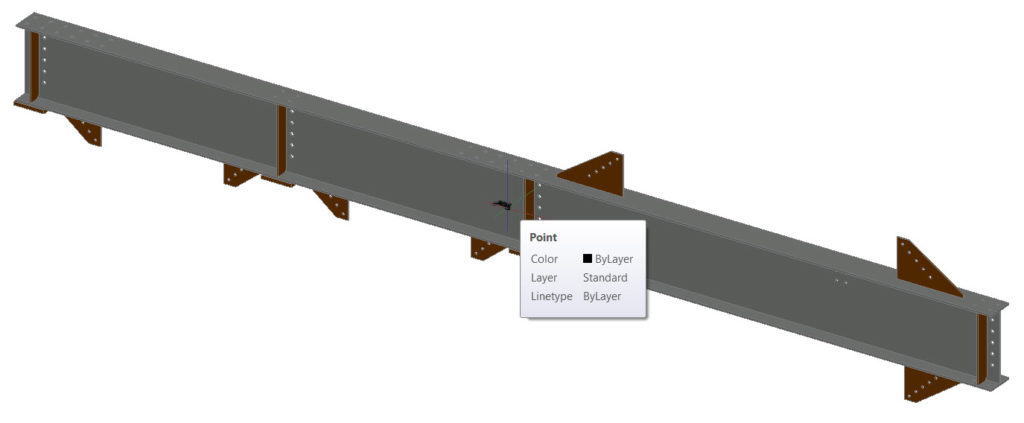
1. Center of Gravity

The Center of Gravity point of an object or an entire assembly can be found in the model by using the “Center of gravity and total weight calculation” command. As a result, an AutoCAD point is displayed in the model showing the center of gravity of that element.

Center of gravity in Advance Steel


2. Assign a Material to a Layer

When defining what an entire object will look like, it is a good idea to create a new material (using a specific color or texture) and assign it to this object. If you want to apply this material to several similar objects on the same layer, the Material Attach command can be used to assign a material to a layer with a simple drag & drop operation.


3. Using specific colors for parts on drawings

You can use specific rules to assign some of the standard AutoCAD colors to Advance Steel objects displayed on drawings. Once these colors are entered in a specific table accessible through the Management Tools, they become available in the Drawing Styles Manager. You can then use them when customizing a drawing style so that your drawings look like you want them to.


4. Convert multiple DWG shop drawings to PDF file

The Document Manager gives you the possibility to convert your DWG drawings to PDF files. But did you know that you can choose between converting into a single PDF file or multiple PDF files?


5. BIM Coordination with a Coordination model

With the collaboration model feature, you can use the Navisworks link to reference models from other members of the design team within Advance Steel to help you develop a better design. In this video, you will see how you can export steel members from a Revit model to Advance Steel, and how you can XREF the rest of the project as a Coordination model through Navisworks.


6. Panorama rendering for Google Cardboard VR

You can generate a Stereo Panorama from your Advance Steel 3D model that can be viewed in a Google Cardboard or compatible device. This offers a great and inexpensive opportunity to check your design in an early stage of the process.


If you want to watch the full class, check out the recording here.

For other Advance Steel tips and tricks, read these posts on BIM and Beam:

If you want to see some other Advance Steel features in action, watch the Advance Steel Product Features playlist on YouTube.

The post Advance Steel Tips, Tricks, and Workflows You’ll Want to Try at the Office appeared first on BIM and Beam.


from my Autodesk source Bim & Beam: BIM and Beam at http://blogs.autodesk.com/bim-and-beam/2018/02/14/advance-steel-tips-and-tricks-and-workflows-youll-want-to-try-at-the-office/
via IFTTT
Sunday 11 February 2018

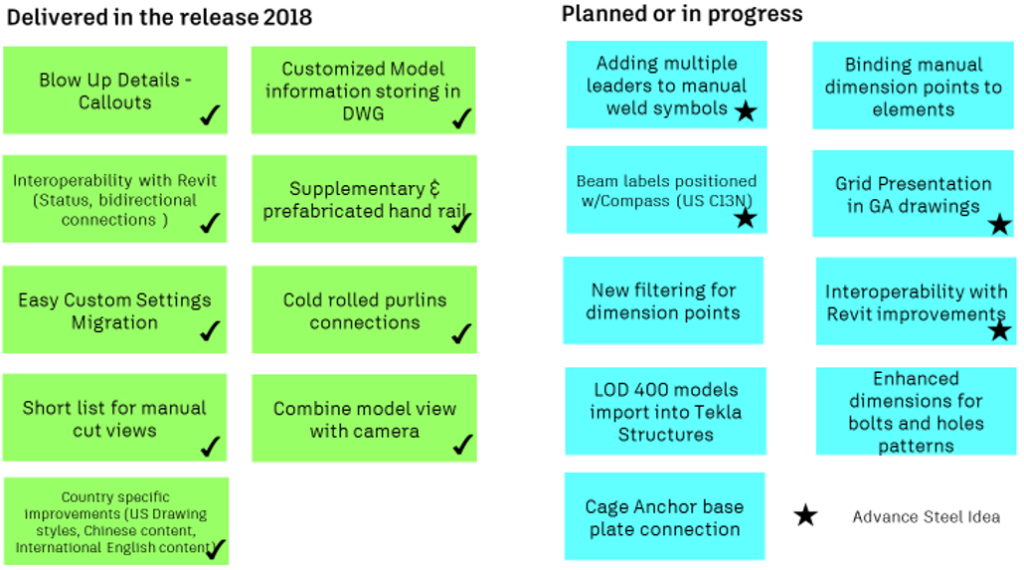
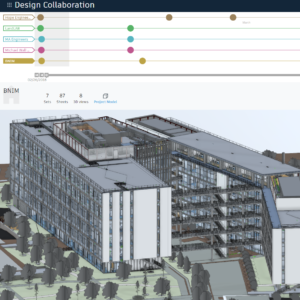
Sharing the Advance Steel Roadmap

Roadmap on the plans for Advance Steel

As we enter into the new year, we would like to share an update about our Advance Steel product  plans. We call this the Advance Steel Roadmap. We want to do this so that our customers can gain greater insight into current and upcoming investments in this product.

Public roadmap sharing ground rules:

  1. We’re sharing some of the highlights of our product development roadmap to give you a sense of the general direction Advance Steel is heading. There’s a lot more work going on behind the scenes and this roadmap doesn’t reflect everything the development teams are working on.
  2. We’re planning to periodically update the roadmap because it is subject to change. When we can, we’ll also share videos that illustrate some of the work-in-progress software.
  3. Roadmaps are plans, not promises. We’re as excited as you to see new functionality make it into the products. However the development, release, and timing of any features or functionality remains at our sole discretion.
  4. These roadmaps should not be used to make purchasing decisions.

Legend

We use these marks and colors to keep track of the roadmap details.

Advance Steel Roadmap Legend


Features and Workflows Enhancements

The feature enhancements are focused on productivity and usability requirements prioritized by users through the Advance Steel Idea webpage. Additionally, our efforts are also focused on making steel detailers and fabricators connected across detailing service providers, fabricators and BIM process stakeholders.

Feature and workflow enhancements

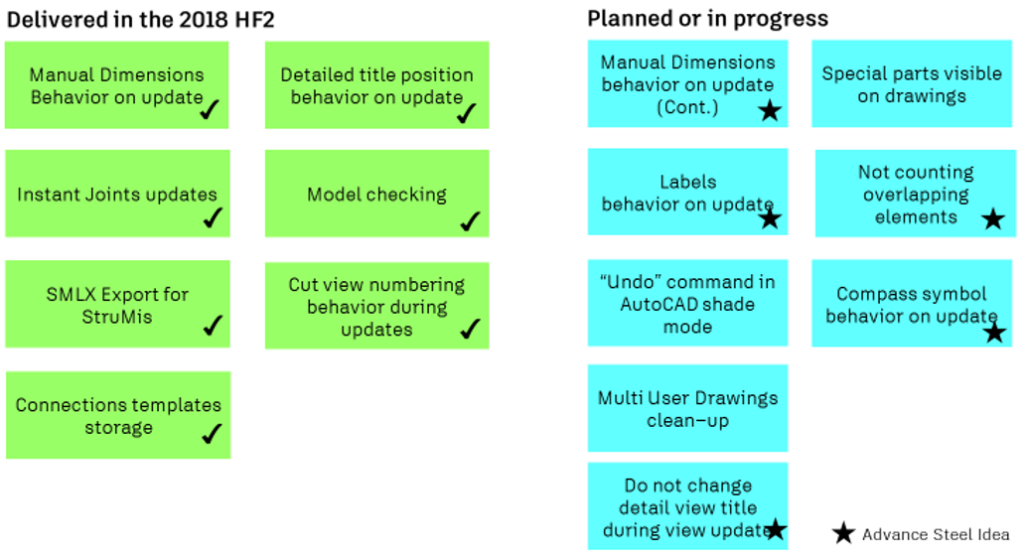
Key Quality Improvements

We continue to look forward to improving the quality and reliability of Advance Steel especially in the area of drawings and documentation. The major focus is on making sure the drawings automation process reflects the original requirements of the detailer and to maintain reliability of drawings quality and behavior throughout model changes.

Key Quality Enhancements

We will continue to post updates on the Advance Steel product plans periodically and appreciate your feedback on any of the items listed.

The post Sharing the Advance Steel Roadmap appeared first on BIM and Beam.


from my Autodesk source Bim & Beam: BIM and Beam at http://blogs.autodesk.com/bim-and-beam/2018/02/12/sharing-advance-steel-roadmap/
via IFTTT
Wednesday 7 February 2018

HOW TO INCREASE REPETITION VALUE OF PLYWOOD?

TIPS ON INCREASING REPETITION VALUE TO PLYWOOD There are many reasons to use plywood as a concrete shuttering materials. Out of those reasons one reason is it’s reuse value. But if proper care has not been taken during handling of plywood then it will not give a higher repetition value. So in this video I […]

The post HOW TO INCREASE REPETITION VALUE OF PLYWOOD? appeared first on CivilBlog.Org.


from CivilBlog.Org http://civilblog.org/2018/02/07/increase-repetition-value-plywood/
via Our favorite Civil Engineering Blog

Tuesday 30 January 2018

EFFECT OF TREE ROOTS ON BUILDING

What Is The Effect of Tree Roots on Building? Fast growing trees close to buildings can cause unequal settlement when active tree roots dry out the soil causing differential soil shrinkage. Shrinking clays affect the bearing capacity and lead to movement in the building, especially in shallow foundations. Tree roots can extend over a considerable […]

The post EFFECT OF TREE ROOTS ON BUILDING appeared first on CivilBlog.Org.


from CivilBlog.Org http://civilblog.org/2018/01/30/effect-tree-roots-building/
via Our favorite Civil Engineering Blog