Tuesday, 30 August 2016

The Future of Making Structural Things

“There is a disturbance in the Force. Can you feel it?”  Being the Star Wars fanatic that I am, this line has a lot of parallels with it, including what is going on in construction here on Earth. We don’t have floating cars and diplomatic robots fluent in 6 million languages yet, but we do see the construction industry being transformed like never before. While we expect to face a number of growing pains along the way, it is an exciting time to be in the industry.

Future Of Making Things

To share some of this excitement, we at Autodesk would like to spend the next few months sharing our vision of the future for how structural things will be designed and made.  We will reflect on how the structural workforce has successfully adapted to trends like BIM and globalization. We will address ongoing challenges facing the structural industry, and discuss where we have been investing to help solve these challenges. We will also talk about trends shaping the future which we believe are important to watch. Not only will they impact how we invest in technology to help our customers, they will impact future generations of structural engineers, detailers, fabricators and trade professionals.

A reflection on the past

Before we look into the future, let’s reflect on the trends that have impacted the structural industry over the past decade and how companies have adopted to them. Looking at fabrication first, the various manufacturing sectors have faced similar trends but have responded to them differently.  All the sectors are seeing a continued shortage of domestic skilled labor which has forced manufacturers to outsource engineering, invest in more technology and adopt more prefabrication methods to reduce the need for labor on site. The structural steel industry has responded to labor shortages and competitive pressures with full force by embracing digital technology more than any sector. In fact, the structural steel fabrication industry has spent the last two decades using 3D model-driven technologies to streamline shop fabrication, reduce waste, and improve quality. This has truly made the steel industry more cost effective, BIM-enabled, and scalable to meet client demand, but there is still room to go. David Weaver from Mold-Tek Technologies Crossroads Detailing, discussed trends in automation for steel fabrication in a recent webcast he did for Autodesk that’s worth checking out here.

The precast concrete, cold-formed steel, and timber industries have started to use model-driven workflows where labor costs are high and prefabrication brings benefits to project delivery. The cast-in-place industry continues to lag in its use of model-driven technologies in design, manufacturing and construction.  Though rebar manufacturing shops use highly automated and optimized processes, their methods are still mostly 2D based.

Looking at structural engineering, the most important trend since the advent of personal computing is the adoption of Building Information Modeling (BIM).  With adoption beginning in the early 2000s, it established a way for project teams to improve collaboration by working within a common, multi-discipline 3D environment.  Structural engineering firms initially adopted BIM to meet client requirements but now see the return-on-investment as a result of better coordinated designs that are easier to communicate to their clients. Firms like Buro Happold and Odeh Engineers have been using BIM for years on complex projects like this one for MassArt in downtown Boston, Massachusetts and this stadium in Natal, Brazil.  The benefits of BIM have also been recognized by owners, now driving BIM mandates along with government agencies across the world.

Odeh-MassArt-Residence-Hall-1

After reflecting upon my own experiences practicing structural engineering, these benefits make sense. While working at Ellerbe Becket back in the 1990s, it was a pre-BIM world that required a lot of coordination between the design disciplines and subcontractors.  One project in particular that I worked on called Devos Place Convention Center would have benefited from using BIM to better coordinate the design between other disciplines, between the structural design and documentation, and to better visualize the complex steel connections in 3-D

The benefits of BIM are real and engineering and fabrication firms are seeing its benefits. However, we must not forget that BIM is not the only trend impacting the industry. There are other challenges beyond new technology that are disrupting the structural industry we know and driving change.

Facing Today’s Challenges

Despite the proven benefits of BIM in engineering and the use of model-driven processes in fabrication, the various structural sectors still feel the pressure from increasing project complexity, globally dispersed teams and accelerated project schedules, and a lack of skilled labor entering the workforce. To overcome these challenges, project teams are finding new ways to collaborate so they can generate new value streams in their project work to remain competitive.  For example, if engineers, fabricators and builders can contractually work together with shared risk and reward, the benefits are significantly greater. Because of this, we are seeing firms change how they deliver projects in a number of ways:

  • Engineering firms and construction firms are merging to provide combined, integrated design to construction services
  • Firms are using more innovative contractual models to deliver projects like Design-Assist, Design-Build or Integrated Project Delivery
  • Firms are forming partnerships to offer integrated services. This could be engineers partnering with steel detailing or fabrication companies or fabricators extending their design-assist services further upstream

You can read more about how California-based structural engineering firm Rutherford + Chekene Structural Engineers is delivering new types of services to differentiate their business.

So haven’t these delivery models already been used in the past?  Yes, they have. What is different now and in the future is a transformation in how construction projects are designed and built that will magnify the benefits of using these new delivery models. We will cover this next.

Trends: Where are we Heading?

We are now at the cusp of a new era of connected design, manufacturing, construction and building operation that is being driven by the digitization of information and connectivity between people, places and things, also referred to as the Internet of Things. I would like to point out a few of the trends that will stem from this era of connectivity and will impact how structures are designed and built over the next decade.

  • New structural materials and systems will emerge that are smart, connected, adaptive and sustainable. Examples of this are self-healing concrete, 3D printed nano-structures and structural systems that dynamically adapt to changes in their environment. One such technology developed by Sensequake uses smart sensors in buildings to study a structure’s resonance behavior so engineers and building owners can better predict structural performance during an earthquake.
  • Self-learning computational methods will automate simple engineering tasks while assisting engineers in performing more complex engineering tasks. This will empower engineers to offer more high-value services.
  • Global work sharing will become commonplace as the world scales its cloud infrastructure, making engineering and detailing services highly competitive.
  • Engineering education will focus on high-value, problem-solving skill sets.  Craft and labor training will require new technology skill sets that are more manufacturing centric. You can read more here about how the National Institute of Steel Detailing now includes BIM curriculum in their future apprenticeship programs.
  • Manufacturing processes will be hyper-connected with the buildings that enclose them to optimize and minimize energy consumption and carbon footprint.
  • Manufacturing-driven innovations like machine learning, lean manufacturing, and modular construction will transform the construction site in response to a growing shortage in skilled domestic labor. A great example of this is the steel industry’s adoption of novel steel modular frame systems developed by ConXtech. You can read more about their technology here.
  • The sharing economy will disrupt how construction projects are funded, designed, built and operated. This will be enabled through the connectivity of teams, manufacturing and jobsite processes and building operations.

Structural engineers, fabricators and builders of the future will think differently in how they design and deliver their projects.

The common theme that will emerge is a hyper-connectedness between people and things that will allow the production of ideas and things to be done in a much more effective and sustainable way.  So how serious should you take these trends? Are others in the industry already preparing for these changes?

Well, let’s look the British Government. They now require all government projects to use BIM starting in 2016 (www.gov.uk/bis). This mandate is a part of their Britain’s ‘Construction 2025’ joint strategy which sets out how industry and government will work together to put Britain at the forefront of global construction over the coming years. Britain believes that using Digital Design with Smart Construction methods will give them a competitive advantage over other world economies.  In other words, if they can reduce the costs to build and operate their infrastructure, they will be more competitive than other economies that don’t.  Their success will put pressure on other economies to follow suit with digitally connected infrastructure so that they compete in a global economy.

What can you expect next?

So what do all these trends mean to you as a structural engineer or a fabricator?  How can you start preparing for these trends now vs later?   We will answer these questions over the next several months as we talk about trends and technology adoption that are specific to certain industries.   We look forward to sharing future posts about the ever-fascinating future of structures.

So what do you think the future of making structural things will look like? We would like to hear what your vision of our industry will be.

The post The Future of Making Structural Things appeared first on BIM and Beam.


from my Autodesk source Bim & Beam: BIM and Beam at http://blogs.autodesk.com/bim-and-beam/2016/08/26/future-making-structural-things/
via IFTTT

Friday, 19 August 2016

Moving from structural design to structural fabrication just got easier

The release of Advance Steel 2017 extends capabilities that allow you to move even more quickly from structural design to structural fabrication. This release focuses on enhancements that improve modeling efficiency, productivity and documentation, and interoperability such as the ability to synchronize not only steel members but also steel connections between models created in Revit and/or Advance Steel.

Structural design to fabrication with Advance Steel 2017 Extension for Revit

Advance Steel Extension for RevitThe Advance Steel 2017 Extension for Revit allows you to manage changes between Revit and Advance Steel including Steel Connections for Revit. The 2017 extension comes with a set of various enhancements which offer a higher level of model information exchange, especially with synchronization for Revit models containing steel connections back and forth with Advance Steel. The “Advance Steel 2017 Extension” for Revit is only compliant with Revit 2017.

The extension can be downloaded and installed from the Autodesk App Store here. Watch out this video if you want to know more about how to install it on your computer.

Steel Connections for Revit helps model to a higher LOD

Steel Connections for RevitThe Steel Connections for Revit extension provides access to a variety of parametric steel connections in Autodesk Revit software, enabling connections to be modeled with a higher level of detail. The application also includes a built-in steel connection design engine based on US and European codes. This functionality helps to bridge the gap between design and fabrication as both members and connections can be better synchronized between Revit and Advance Steel for detailing.
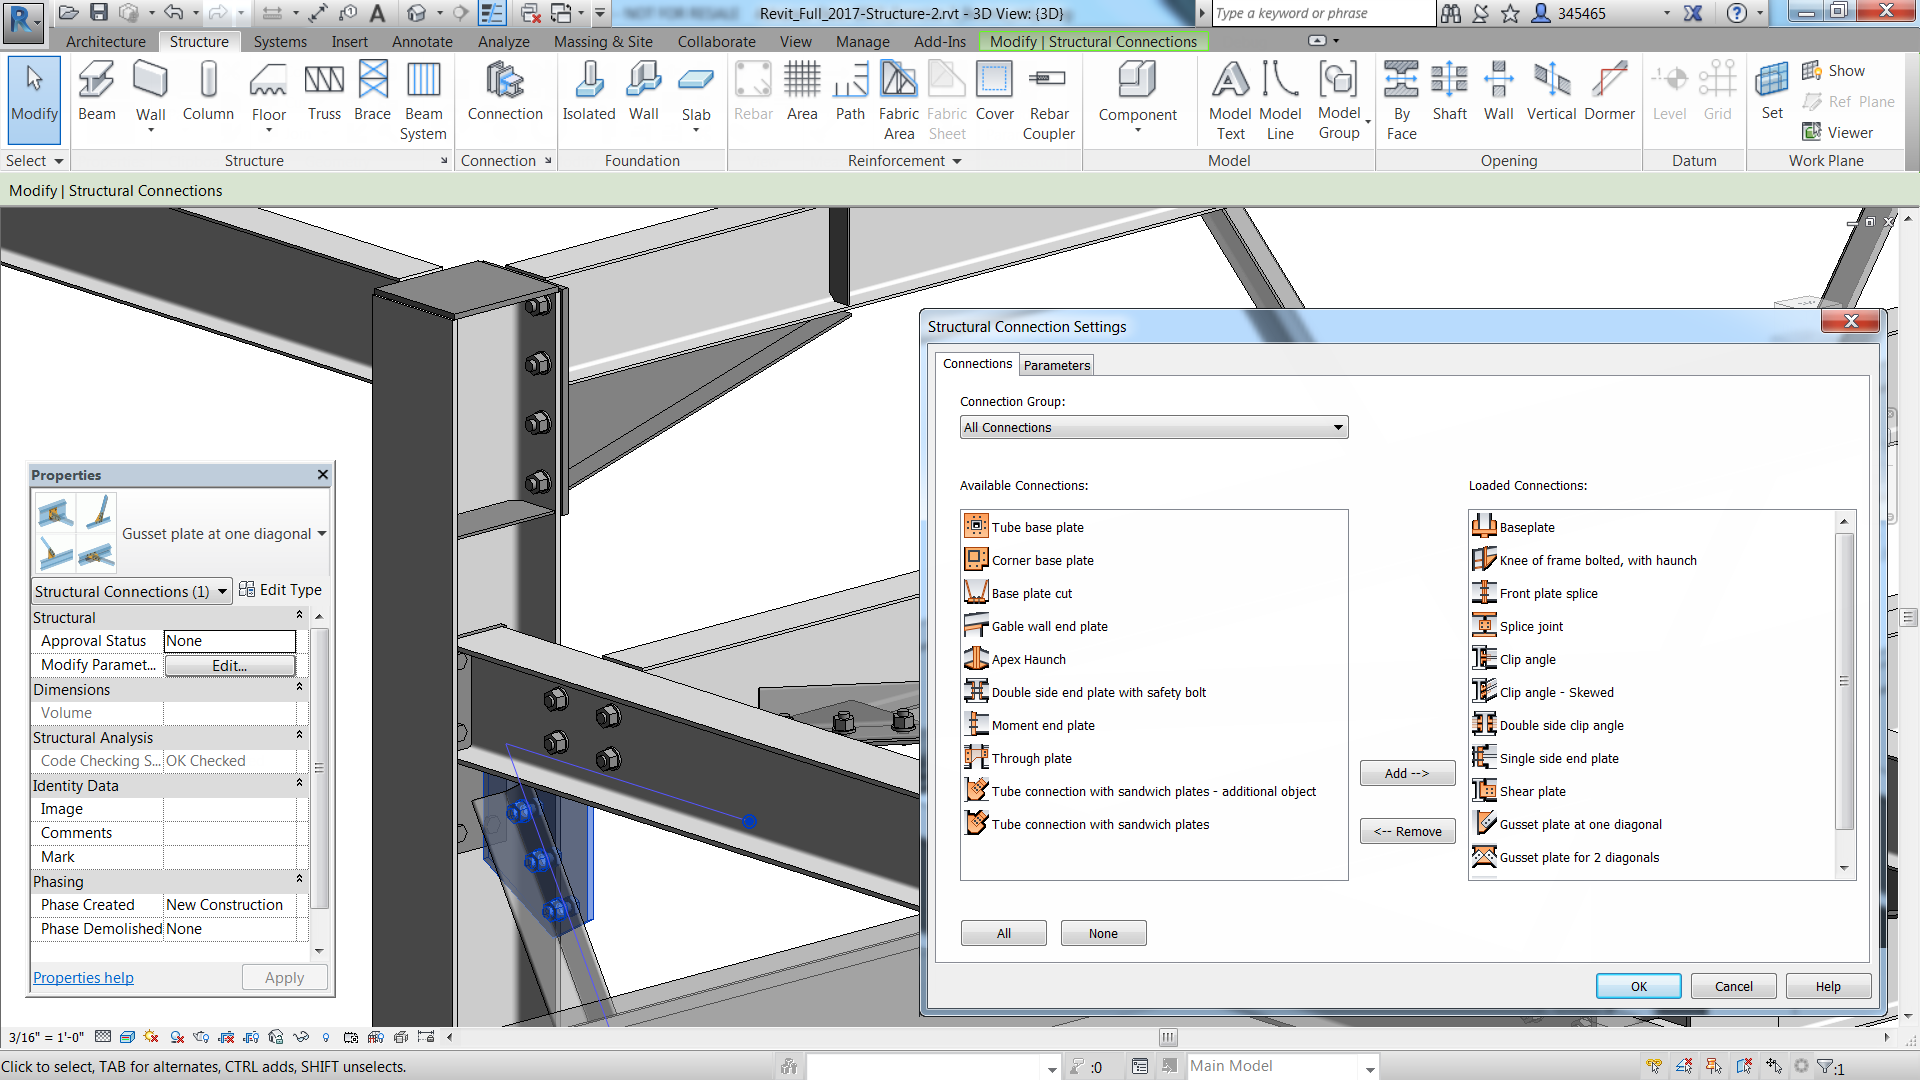
Steel Connections for Revit 2017 makes structural design to structural fabrication easier

Steel Connections for Revit enables connections to be modeled with a higher level of detail.

The extension is available for Revit current subscribers and can be downloaded and installed from their Autodesk Desktop App or through the Autodesk Account. Watch out this video if you want to know more about how to install it on your computer.

Check out this previous post on BIM and Beam to watch the video showing the complete workflow for faster structural design to structural fabrication.

The post Moving from structural design to structural fabrication just got easier appeared first on BIM and Beam.


from my Autodesk source Bim & Beam: BIM and Beam at http://blogs.autodesk.com/bim-and-beam/2016/08/19/moving-from-structural-design-to-structural-fabrication-just-got-easier/
via IFTTT

Wednesday, 17 August 2016

MEP and Structural Fabricators Forum registration is open!

MEP and Structural Fabricators Forum

Top 5 reasons to attend the MEP and Structural Fabricators Forum

Registration is now open for the MEP and Structural Fabricators Forum. Why should you care? Because the Autodesk MEP and Structural Fabricators Forum might just be one of the most cost-effective educational and professional development opportunities you have all year. Our aim is to give you the business and technical knowledge that you need for your job and for your business.

When: November 14th, 2016

Where: Venetian Hotel  |  Las Vegas, Nevada, USA

Time: 8AM – 8:30 PM

The Forum provides a unique opportunity to meet and speak with your peers and practitioners in the field and to exchange ideas, strategies, and to build partnerships. But that’s not all! Here are the top 5 reasons why you don’t want to miss this event.

1. Stay up-to-date with the latest industry trends

Select sessions led by knowledgeable technical experts who really understand your business. Our lecture style sessions focus on how technology can benefit your business, how to ramp up with new technology, and how to implement new business processes. Check out some of last year’s great sessions:

Modern Mechanical Contracting: An Integrated Approach

The Future of Structural Detailing with Advance Steel, Revit Structure, and NISD

Fabrication: 60 Tips in 60 Minutes

2. Earn PDH Hours

We know that meeting your PDH requirements can be time-consuming. As an extra benefit of attending the Forum, you will also receive Certificate of Attendance that can be applied toward CEU’s or PDHs (based on your discretion.)

3. Increase your BIM IQ

The MEP and Structural Fabricators Form has a focus on intermediate to advanced classes. Technical Instructional Demos will give you an overview of how to use BIM to make your workflows more efficient.   Hands-On Labs will walk you through step-by-step instruction on how to use the most up-to-date versions of our software, resulting in increased productivity for you and your team. No need to bring your own laptop; we provide the computers.

4. Network with your peers

Meet and mingle with peers who “speak your language” and face the same day-to-day challenges that you do in our third annual networking event. Don’t be surprised if a single conversation leads to a new business relationship.

5. Las Vegas, baby

That’s right—the fun, high energy town of Las Vegas, Nevada, USA.  Always on and always a choose-your-own-adventure destination. Need more reasons?  Just ask!

Register Now!


The post MEP and Structural Fabricators Forum registration is open! appeared first on BIM and Beam.


from my Autodesk source Bim & Beam: BIM and Beam at http://blogs.autodesk.com/bim-and-beam/2016/08/17/mep-and-structural-fabricators-forum-registration-is-open/
via IFTTT

Tuesday, 2 August 2016

What Is TPO Roofing?

Our article on TPO Roofing was originally posted here via our website @ http://www.RoofingTRI.com

Ask any commercial roofing contractor what their preferred roofing substrate it and you’re bound to get consistently high marks for TPO Roofing.  Otherwise known as Thermoplastic polyolefin, TPO is a single ply type of roofing substrate and is considered the “new kid” to the market even though it’s been widely available for the last 20 years.  Recently, as more and more companies are going green, TPO has been gaining market share thanks to its reputation as a sun-reflecting roofing style.

Here at TRI Roofing we’ve noticed a significant upward trend in the number of calls for TPO in the last 5 years from business and homes with low pitch or flat roofs.  Thanks in part not only to its green reputation, but also to its good relative value.
In this article, we’ll take a look at where TPO roofing is commonly installed, its benefits and drawbacks, and find out exactly why they are getting so popular with contractors and customers.

Cost Effective

TPO Installation
Upon initial estimation, TPO may turn folks off due to the high relative material costs.   Depending on the material specification, you can estimate the material costs will run 15% – 25% more than EPDM or PVC.  However, on a total net cost level, which includes installation, TPO roofing costs are actually in line or just *slightly* higher than PVC or EPDM rubber roofing alternatives.
Since the TPO compound is much lighter, installation costs are relatively cheap, since it’s easier to manage up and around the roof than other roll type applications.  Also, instead of having to apply tar like in a Bitumen style roof, which can be extremely messy, TPO rolls can simply be draped over the roof and fastened, providing a quick and easy solution to adding roofing material.
Also, the seaming process is much easier compared with EPDM or PVC.  While there are a number of ways of seaming the ply’s including hand-held welders and tape, we recommend using a wheeled robotic welder which applies just the right amount of heat, to securely and quickly install a leak free roof.

Durable

TPO Install with Handheld Torch
TPO roofing can last about 35 years on average and up to 45 to 50 years if properly maintained. The TPO chemical make-up was patent designed with roofing in mind and generally protect than competing roofing system against UV degradation, acid rain, ozone and chemical exposure.   Additionally TPO holds up comparable again that delivered by the sun, even in the hottest of temperatures.  Likewise, as mentioned above, the seams are exceptionally strong and maintain their integrity as long as the roof itself, providing the joint seams have been applied correctly.

Earth Friendly

Available now in almost any color under the sun (pun intended), you’ll usually see most business opt for Black, White and Gray.   For businesses opting for white in hotter climates, you’ll get yourself the highest energy rating from the US EPA Energy Star and LEEDS.  This is due not only to the fact that white COLOR reflects the heat better, but also because the reflective sheen of TPO magnifies this effect.  Moreover, the makeup of TPO has a high percentage of recycled product, much like EPDM rubber.

Conclusion

If you’ve got a low pitch or flat roof, we recommend giving TPO a look. It is lightweight, affordable and can be installed in just hours, providing years of worry free protection and durability.  And because of its terrific reputation for energy efficiency, it’s fast becoming the material of choice for many new commercial contracts.

Looking for flat roof or commercial roofing installation in the Triangle?  Give T-R-I Roofing a “tri”.  We’ve got a dedicated and experience crew of roofer and a great support staff to help walk you through all the viable options to best fit your needs.  Give us a call today at (919) 296-0017 and one of our trained office staff will be happy to help!

from Blogger http://roofingnewsandblog.blogspot.com/2016/08/what-is-tpo-roofing.html
via IFTTT


source https://roofingtri.wordpress.com/2016/08/02/what-is-tpo-roofing-2/

Slate Roofing

Our article on Slate Roofs was originally posted via our site @ http://www.RoofingTRI.com – enjoy!

A slate roof is the quintessence material used by homeowners when cost is no object.  Used as the preferred method in antiquity, it’s easy to see why slate is the go to choice for long-term use. If installed correctly, well designed slate roofing can last 150 years or more!   It doesn’t burn or corrode over time, it’s easy to cut and if installed correctly, a slate roof can look absolutely stunning.  A good example of slate stone’s extreme durability can be found in older cemeteries prior to 1800.

Slate Tile Gravestones
Take a look around to locate the blue-gray headstones made with slate.  Despite being subjected to rain, wind and time over centuries, the inscriptions and the original shape of the slate are generally still very much intact, while the inscriptions on many newer headstones made of limestone or sandstone are hardly discernible.

Slate Costs

It stands to reason that a slate roof will cost much more than your standard residential roof.  Where architectural shingles cost between $80 and $100 per square (100 square feet), the slate tiles themselves can run between $300 and $650 per square.  The wide cost disparity is due to the wide range of slate stone quality.  The finest quality of slate is mined deep below the earth’ surface far away from the elements – it’s heavy, hard, uniform in appearance, and can take a beating.  Lesser quality slate on the other hand, is found on or near the surface where it has been subjected to time and weather.  It chips easier, contains flaws and is less dense making it a less attractive material for roofing.
Slate is heavy, and in turn the installation is much more involved.  Before any installation can begin, you’ll need to understand if your home’s structure will support the weight of the slate.  If not, your roof structure will need to be re-engineered.  An experienced roofer and architect (yes both) can help you determine how to move forward.
In terms of time and labor, slate roofing costs can often equal or exceed the material costs with an average cost of $275 to $450 per square.  Additionally installation material can run between $60 – $90 per square, since the use of 16 oz. copper fasteners, nails and flashing is highly recommended over iron-based steel which will corrode, expand and damage the slate over time.

Synthetic Slate

For the best of both worlds in terms of price and quality, many homeowners nowadays are turning towards synthetic slate tiles.  At about a third of the price and a quarter of the weight, synthetic slate tiles are injection molded from oil-based recycles materials (think old tires) to reproduce the look of authentic slate.  They come in many different colors and styles and since the weight is so much less than the real deal, installation is much easier.  The best part is: many of these manufacturers offer 50 year guarantees and, if installed correctly can last 75 years or more.  Although it is difficult to discern from the ground, synthetic slate will not have the color and shape variations of its real slate counterpart.

Slate Roofing Maintenance

Because installation can be difficult you’ll need a roofer with experience specifically in slate to address any roof repairs on a roof slate.   Cracked, broken, and missing slates should be addressed quickly with the intention of preventing water damage to their interior surfaces, structural ruin to the frames as well as roof sheathing and hastened deterioration of the roof. The roofer should first remove the damaged slate using a ripper to cut and pull out its nails. If roofers used steel cut nails instead of copper nails to lay the slate roof, then the ripping process might unintentionally damage or displace adjacent slates, which will need repair as well. When the slate roof repair requires the removal of many slates, the roofer should check the sheathing for projecting nails and rotted areas.
However, if at all a slate roof is beyond repair, replacement with a new slate can be a huge financial responsibility. One should use new wood boards having the same thickness and width as the damaged ones to replace them. One should not use pressure treated wood because it tends to shrink, hence making vinyl roofing slates to crack.

Looking for a qualified Roofing expert for your home or commercial roofing project?  Give Roofing TRI a try!  We service the Durham / Raleigh / Chapel Triangle and would be happy to talk to you about your specific needs.  We’re happy to give out free advice too!  Call us today at (919) 296-0017.

from Blogger http://roofingnewsandblog.blogspot.com/2016/08/slate-roofing.html
via IFTTT


source https://roofingtri.wordpress.com/2016/08/02/slate-roofing/

EPDM Rubber Roofing


The article EPDM Rubber Roofing was originally posted via our business site @ http://www.TRIRoofing.com…

Commonly known as the “rubber roof”, EPDM roofing is a popular choice for flat topped homes and businesses alike thanks in large part to its perception of easy installation and relatively low material cost.  Consisting of two main distillates of natural gas and oil, ethylene and propylene, EPDM has can easily withstand extreme temperature fluctuations and is resistant to moisture.
While many customers are drawn to these qualities, and of having a roof installed quickly and easily, customers should be aware that there are some disadvantages to using EPDM.  Today we’ll explore the pluses and minuses of EPDM and give recommendations on the best installation techniques in order to get the most life out of your rubber roof.

Advantages and Disadvantages of EPDM

EPDM is relatively new on the scene as a substrate for use of a low pitch roof.  As with any product it has advantages and disadvantages to other low slop roof alternatives including Bitumen and PVC:

Pros:

  • If installed correctly a EPDM roof can last 25 – 45 years.
  • Resistant to chemicals, UV rays from sunlight
  • If a leak is found, the repair is easy and inexpensive.  Many owners repair themselves rather than hiring out
  • Fire resistant
  • Total cost including installation is relatively inexpensive
  • EPDM stays flexible even in the coldest weather and can adapt to a settling structure
  • Made of recycled materials

Cons:

  • Can be difficult to locate the source of a leak
  • More seams = more potential leaks.   More seams will be required is you have an abundance of outcroppings like multiple HVAC units, chimneys, and pipes
  • Rubber is a tough substrate but not impervious to a falling tree branch.  If you’re structure is covered by trees, you may consider an alternative like a Built Up Roof (BUR) option
  • White colored option costs significantly more than Bitumen as an energy efficient option in hotter climates.
  • Geese LOVE to peck at EPDM roofing.  Make sure you have a plan to keep these pesky birds away.

Installing a Rubber Roof

Application of EPDM Rolls

For an experienced roofer, easy installation is where EPDM shines, with each manufacturer looking to one up the other in this category for an advantage.  Regardless of the manufacturer, the general steps nevertheless remain the same:  (1) Planning (2) Preparation, (3) Laying the membranes / rolls, (4) edging and (5) splicing.

Before You Begin 

Before starting the project make sure you understand the requirements for the job.  Is there a high possibility that the roof will be punctured from covering tree?  You may want to consider a thicker membrane.  Is energy efficiency a requirement?  Again, you may consider a thicker membrane, but one in white that can reflect sunlight.  Once you have a good idea of the requirements, draw the layout of the roof and to get a good idea of the square footage and the size rolls and materials that you’ll need. 

Standard EPDM comes in black in widths of 2’, 5’ and 10’ while the thicknesses are typically available in 45mm, 60mm and 90mm.  Alternatives to these standards are available (including 50’ widths), but generally cost more money.   One thing to keep in mind when planning:  thicker rolls are much more difficult to install, so adjust your schedule accordingly.

Preparation 

Surface preparation is relatively easy.  Make sure the substrate is clean and dry and don’t plan on installing if the weatherman is calling for rain.  Temperatures ideally should be above 40 degrees F; however the improved material used nowadays remains pliable at much cooler temperatures.  As a result this requirement is nearly obsolete as we’ve done jobs in 15 F degree weather.  Again check with the manufacturing specs to make sure.

Laying It Out 

Depending on the manufacturer, the rubber membrane (layers) can be fastened, laid loosely or adhered to the roof surface using a bonding agent.  Most require an overlap of the adjoining layer of about 3”.  Once the layers are aligned, they should be fastened to the surface according to the manufacturer’s specifications.    Normally these base sheets should be secured to the roof using round metal capped nails at a good distance from the seams.  We recommend 2 to 3 inches back from the seam.

Edging 

Typically drip edges are required to secure the rolls to the perimeter of the roof.  These should be installed to the eves and drakes using roofing nails in a staggered pattern.

Seaming 

Once the base sheets have been laid and properly edged, it’s time to seal the seams and nail holes.  It depends on the manufacture, but most recommend seam tape splicing on the bottom edge of the adjoining layer, while others recommend a liquid adhesive (PICTURE).
Now that the base sheets have been integrated, it’s time to seal the joint.  With an appropriate sized trowel, seal the drip edges AND nail roles to the base membrane using flashing cement.

Repairing EPDM 

Rubber Roof Patch

If you’ve encountered a leak on your EPDM roof, first you’ll need to locate the leak.  The good thing with locating a leak a flat roof:  when you’ve located the leak on the inside the failure point can’t be too far away.  This is unlike a pitched roof where the water can travel a good distance down the joists or plywood from the offending leak point.  Concentrate of the seams near the leak point and press any suspected seams to see if water leaks out.  If this seam check doesn’t track out, then look for holes in the membrane itself.  These may be a little easier to identify visually. (PICTURE)

Once you’ve identified the leak, the repair is easy.  We recommend using a patch kit like this.  Before applying a patch kit, make sure that the hole is dry and clean.  Use a roller to ensure than any patch is perfectly flat again the roof surface.

Need a EPDM Roofing Contractor?

Thanks for reading our article.  While we don’t think EPDM is for everyone, we do think it’s a good option for many project involving low pitched roofs and we sincerely hope it helps!

If you’re considering installation of a rubber EPDM roof, or need roof repair services consider TRI Roofing.  Located in Durham, North Carolina TRI is a fully licensed home improvement and commercial roofer contractor and is dedicated to serving the Triangle’s roofing needs. 

We provide excellent service, and the absolute best workmanship and products.   For our customers that means the best price, the best service, and the best quality to meet their individual and unique needs.  Give us a call today at (919) 296-0017.

from Blogger http://roofingnewsandblog.blogspot.com/2016/08/epdm-rubber-roofing.html
via IFTTT


source https://roofingtri.wordpress.com/2016/08/02/epdm-rubber-roofing/

Locating a Roof Leak

Locating a Roof Leak posted originally via the TRI Roofing business site…

So an odd colored ring or spot suddenly and mysteriously shows up on your ceiling, you’re thinking to yourself “hey, maybe it’s just some condensation from the cold weather we’ve been having”.  Sorry pal, chances are good you’ve got a roof leak.  Unfortunately like most home-related issues, leaky roofs don’t fix themselves; they usually need immediate attention.  Water leaks can quickly produce mold, rotted joists, insulation and drywall damage given the right conditions.  Often times the spot is just the ‘tip of the iceberg’, insidiously hiding the larger damage of a longer running roof issue.  The good news is: compared to other household repairs, fixing a leaking roof is easy.
Now the bad news:  finding the leak is harder than it sounds, even for seasoned professional.  It takes a strategy, some know-how and – like a good detective – you’ve got to follow the clues to get to the source.  In part one of Fixing Your Leaking Roof, we’ll delve into how to successfully troubleshoot suspected roof leaks like a pro so you can quickly fix the leak before it becomes a major issue.

Before You Begin

Most residential homes in the United States have pitched roofs where water can travel a good distance away from the leak down the roof joists and panels.  As a result, finding the leak based on the location of the offending spot really only gives you a clue of which side of the roof the leak may be occurring.  But like any good detective, this clue can give enough information to start the investigation.
At this point you’ll need a few items to begin your analysis:
  • A flash light
  • A willing helper
  • A garden hose with nozzle 
  • 2 cell phones or walkie-talkies

Locating the Leak

Before you get on your roof with a garden hose (we’ll get to that in a minute), try accessing your attic or exposed dormer area above the discoloration and take a look around with a flashlight.  From here you can get a good idea of the any underlying damage and, if you’re lucky, you’ll see a “mold trail” in the general area where the leak is occurring.  Be sure to visually cover as much area as you can as mold and water can find their way into even the most hidden pockets of your home’s structure.
Next you’ll need to get on your roof.  Leave your buddy behind in the attic and get on your roof with the garden hose.

*Safety Tip:  If you plan on getting on your roof, we highly recommend a roof stabilizer (PICTURE) and roofing shoes for better grip. 

Before unloading a deluge of water, walk the roof to check for any obvious signs of external damage like a missing shingle or dislodged flashing around the joints.  If nothing immediately jumps out at you, we suggest looking for obvious signs of fatigue in these areas:
Roof Valleys
Roof Valley
Vent Pipes
  • Missing or dislodged nails on the pipe flashing
  • Rubber boots are cracked and need to be replaced
  • Flashing on the vent pipes are rusted
 Ridge Cap
Roof Ridge Cap


  • The ridge cap shingles of your roof takes most of the weather related beating and should be checked for loose nails or bulging
Chimney / Dormers

Roof Flashing on Chimney
  • Make sure that flashing around the Chimneys and Dormers are properly overlapping.  Often times they become dislodged and have slid over the preceding piece creating a gap
  • Another area of concern is on the corner joint.  Flashing here requires expert installation and many times we see leaking due to shoddy workmanship
  • Missing or rotted siding on the dormer
  • Check the caulk integrity between flashing
At this point you’ve probably uncovered a few problem areas to concentrate on.  Spray a generous amount of water on these areas, coordinating with your partner under the house to see where the water is making its way through.

Small Leaks Can Mean BIG damage

Over the years we’ve been involved with dozens of projects where the homeowners could have avoided huge Roofing Costs involving repair and remediation had they just dealt with that spot on the ceiling earlier.  If you get anything from this article, remember:  Do yourself a huge favor and deal with any wall or ceiling discoloration like it’s an actual roof leak.

If you’re not comfortable getting on your roof or if the leak seems extensive, don’t hesitate to contact a professional like TRI Roofing.  We service the Durham / Raleigh / Chapel Triangle and would be happy to talk to you about your specific needs.  We’re happy to give out free advice too!  Call us today at (919) 296-0017.

from Blogger http://roofingnewsandblog.blogspot.com/2016/08/locating-roof-leak.html
via IFTTT


source https://roofingtri.wordpress.com/2016/08/02/locating-a-roof-leak/